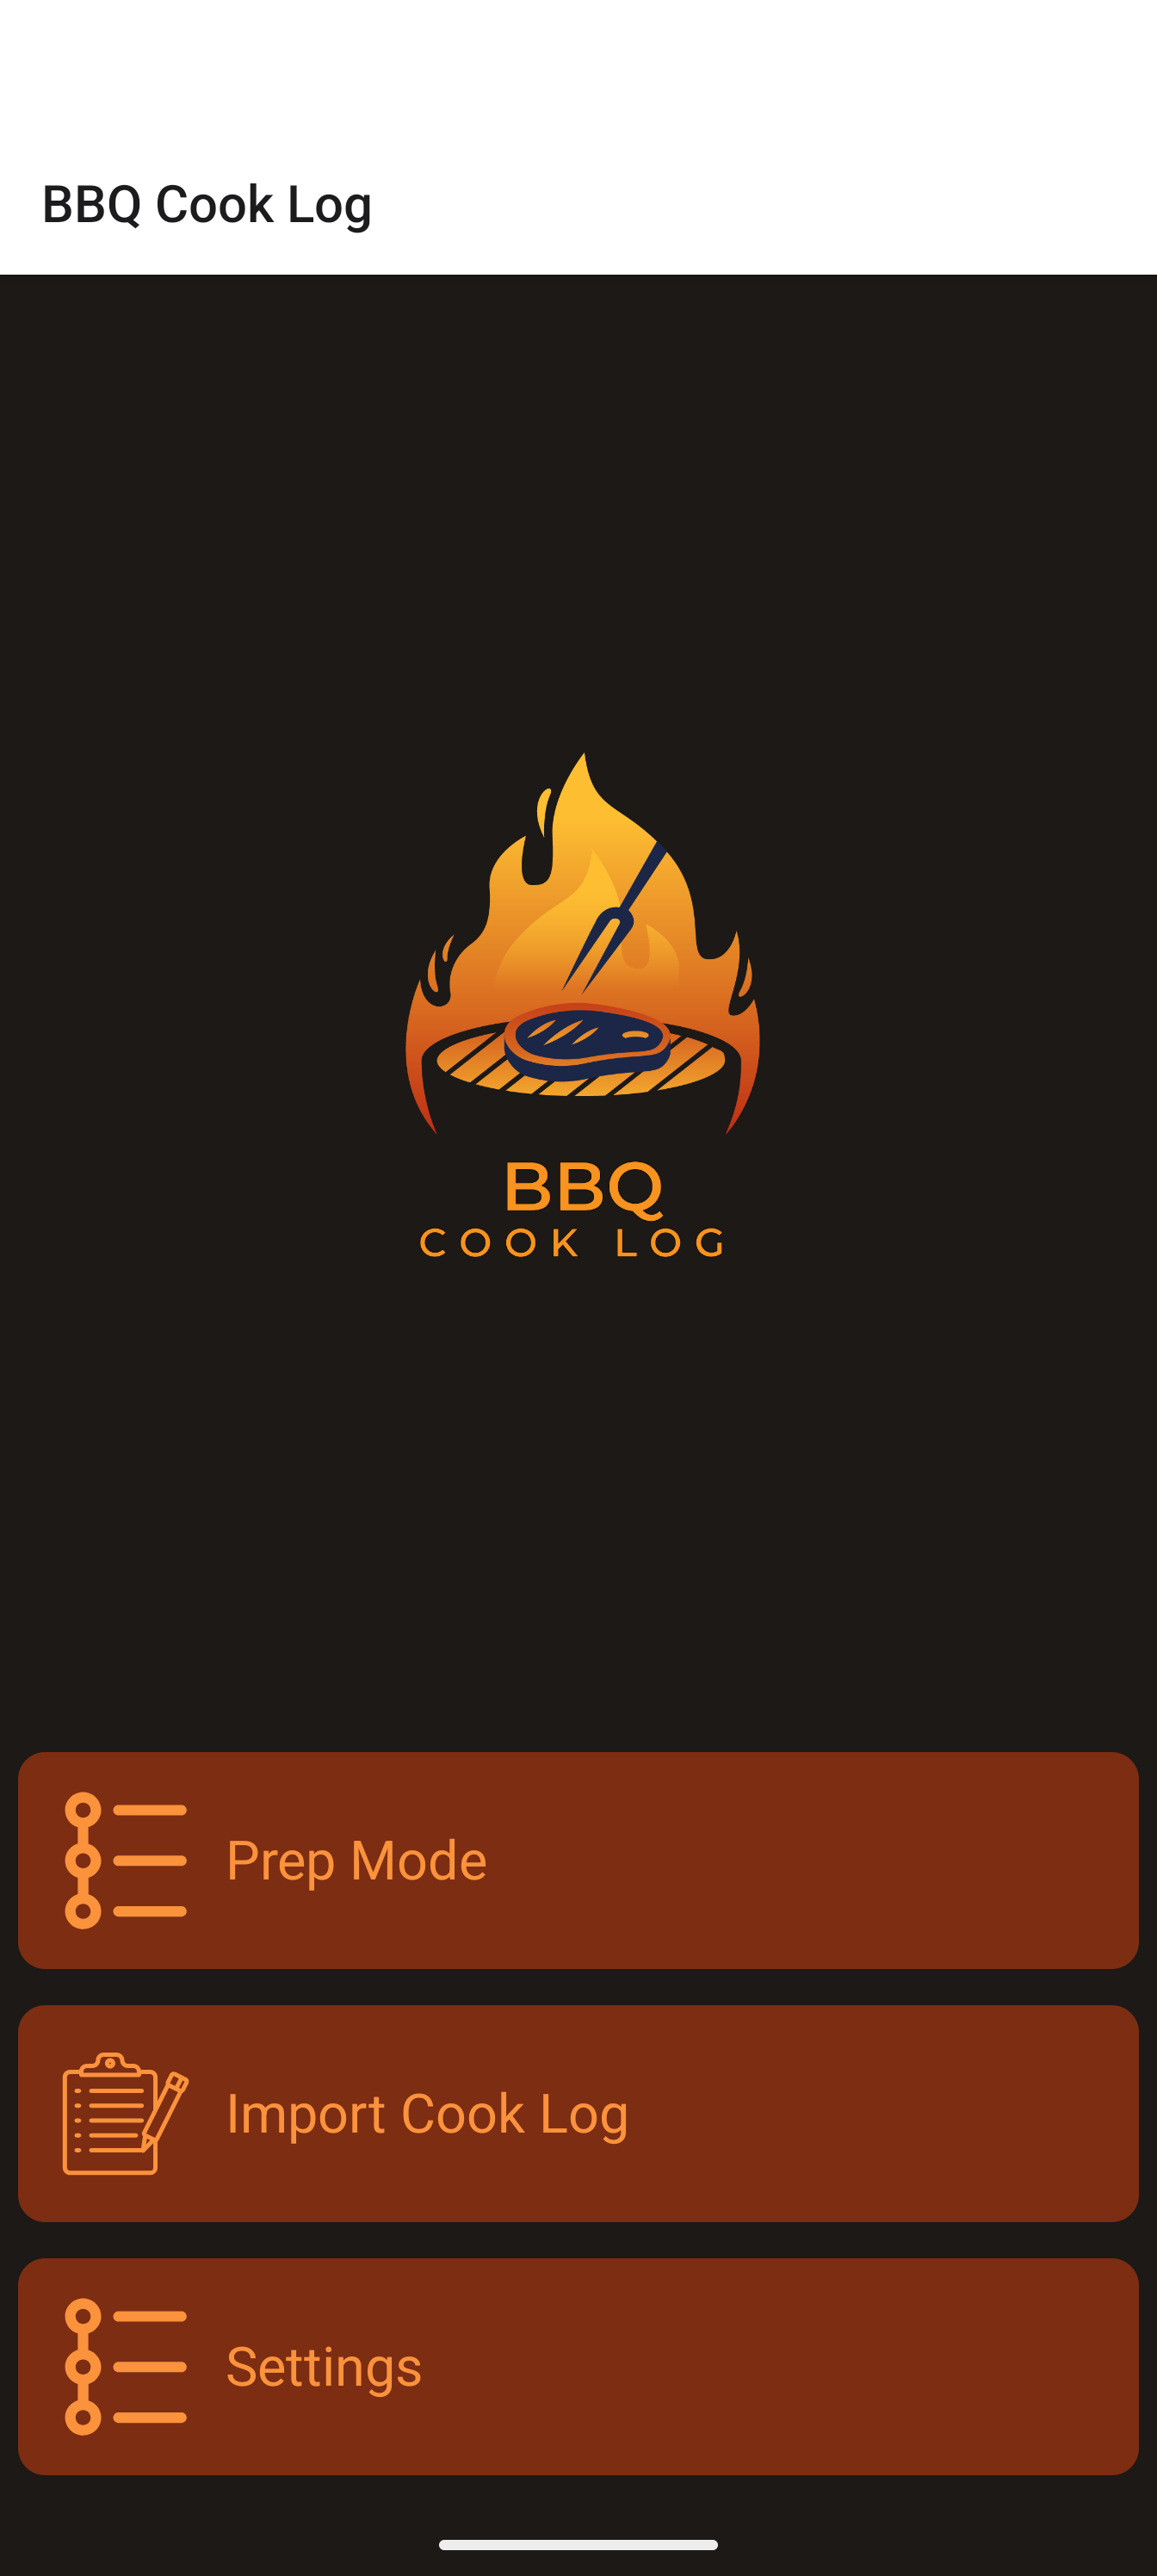
Run your whole cook, start to finish.
From a blank install to cloning a winning cook for next weekend. Written for competition teams of any experience — but it assumes you're new to the app.
For all sanctioning bodies · iOS & Android · No internet required
01 How the app is organized
BBQ Cook Log has three modes that match the rhythm of a contest:
| Mode | Who | For |
|---|---|---|
| Prep | Captain | Build reusable templates and assemble them into a plan. |
| Competition | Whole team | Follow one unified countdown across every meat. Complete or skip events; adjust turn-ins live. |
| Review | Captain | Record weights, judge scores, placements, photos and fuel — then clone for next time. |
There are two roles, set per device:
- Captain — builds the library, creates categories, assembles cook logs, records results. Sees Prep Mode.
- Team Member — receives the plan and runs Competition Mode. Does not see Prep Mode.
The home screen is your launch pad — buttons appear only when relevant: Prep Mode (captains), Competition Mode (when a cook is active), Review Mode (when a cook awaits review), Past Cook Logs (after your first completed cook), plus Import Cook Log and Settings, always available.
02 Set up your team
"Setting up a team" means telling each device who it belongs to and naming your team. Sharing the actual plan happens by file (Section 10). Do this on every device on your team.
- From the home screen, tap Settings.
- Under Role, tap Captain or Team Member.
- Under Team Name, tap the field ("Enter team name") and type your team's name.
- Close the keyboard — the team name saves automatically.
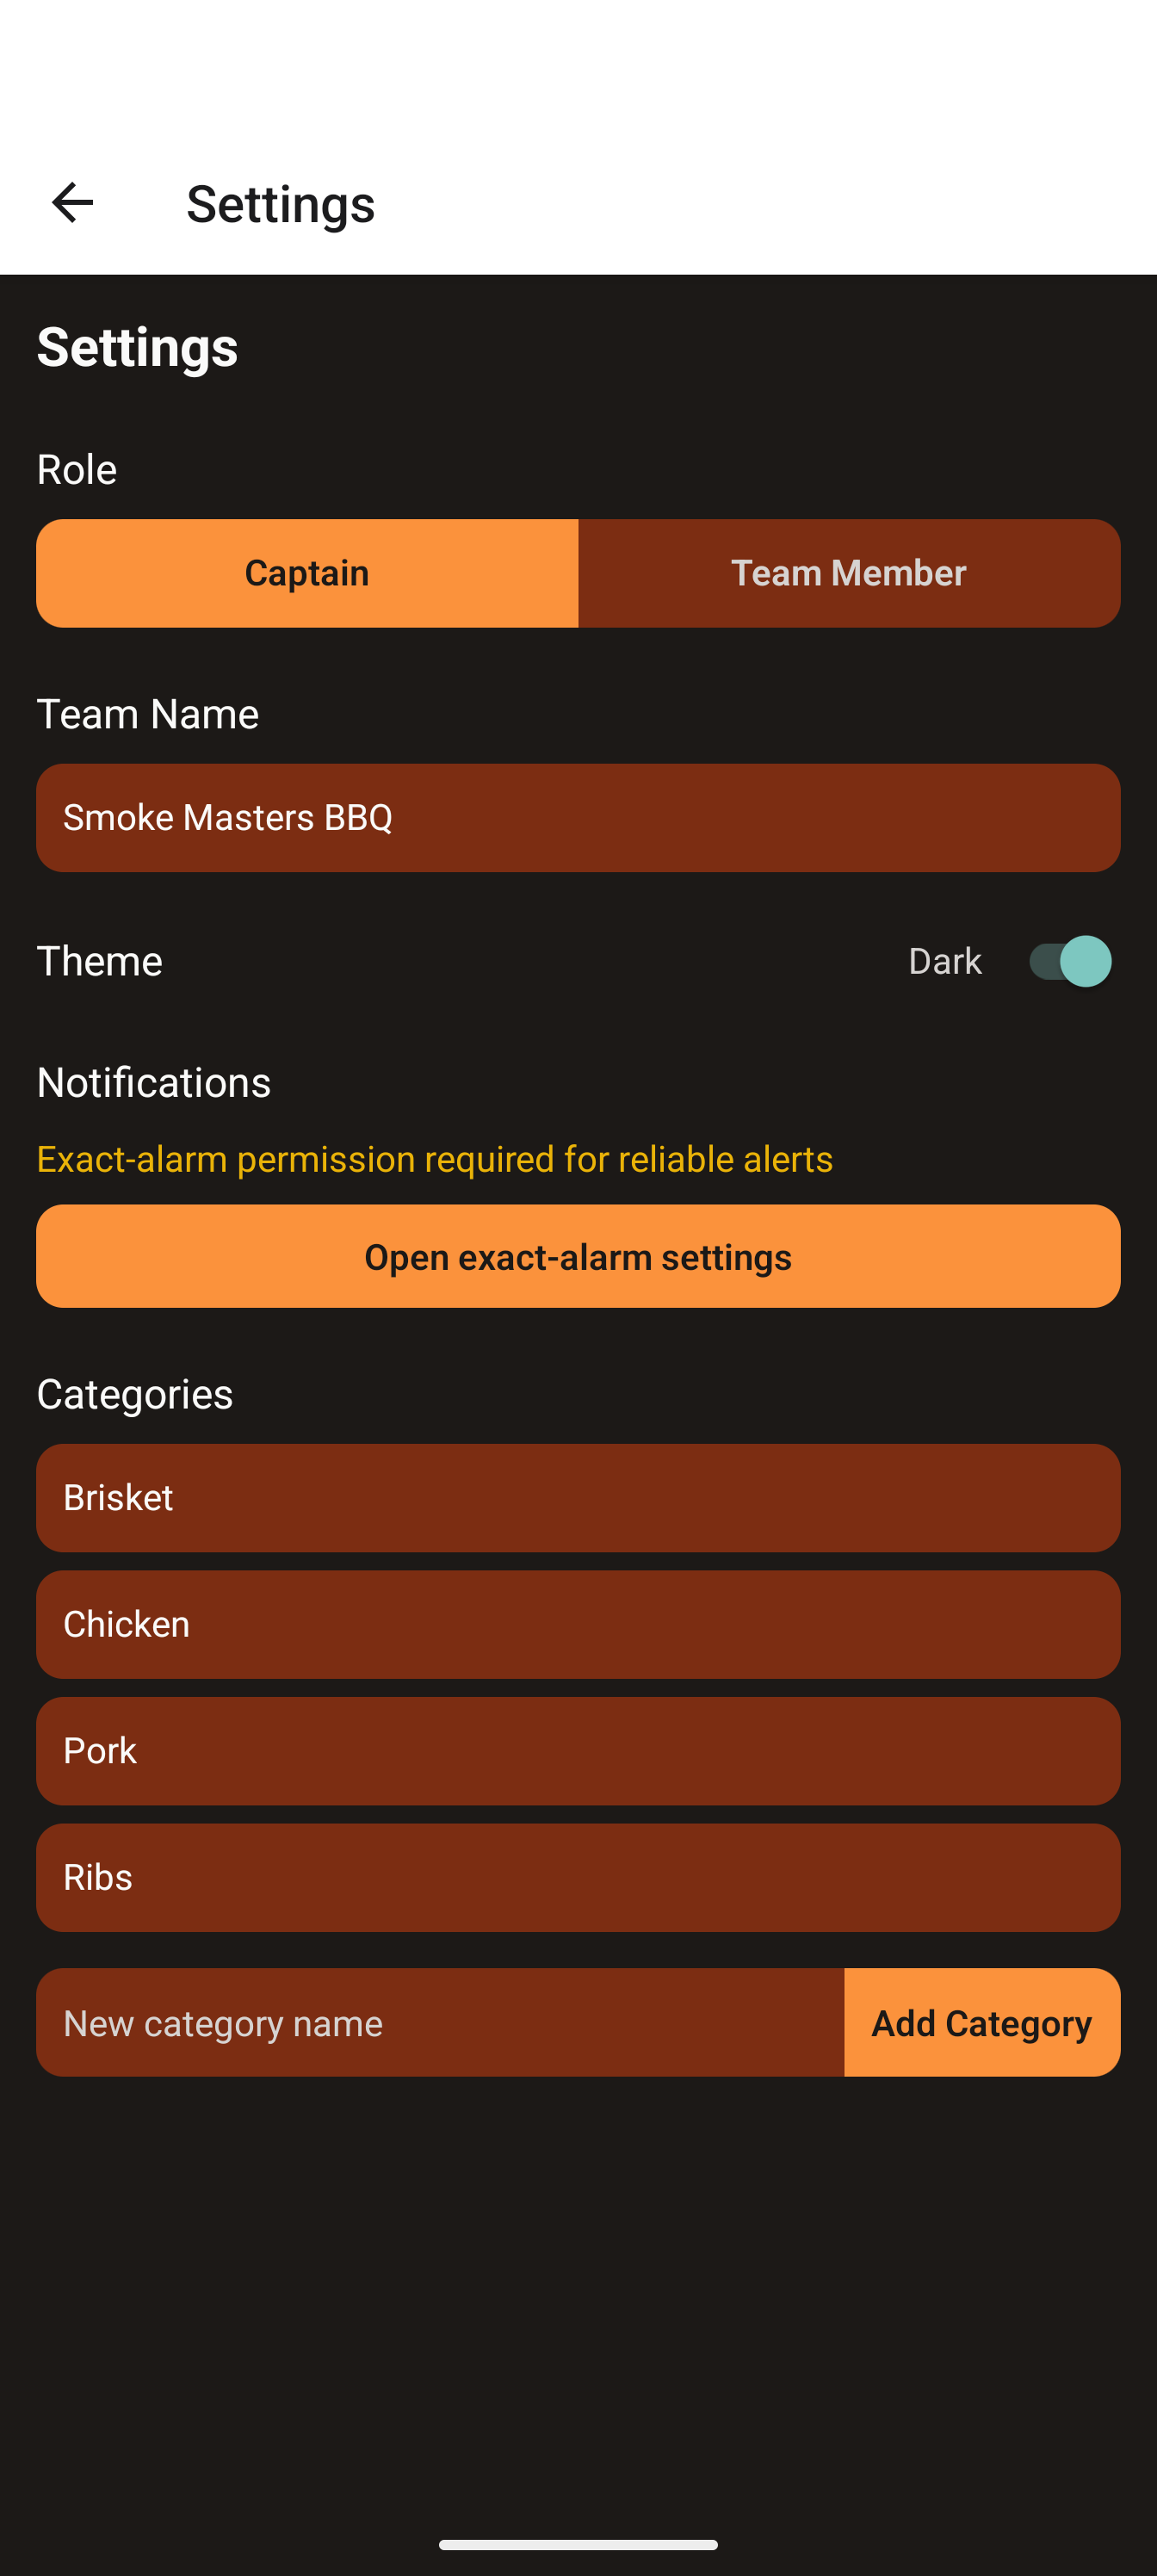
Optional — Theme: Settings also has a Theme toggle between Light and Dark. Dark is easier on the eyes during a 2 AM brisket check.
03 Turn on alerts (and exact alarms on Android)
The two-tier alerts are the heart of Competition Mode: a gentle heads-up, then a loud exact-time alarm with heavy vibration. Set this up before your first competition.
- Home → Settings.
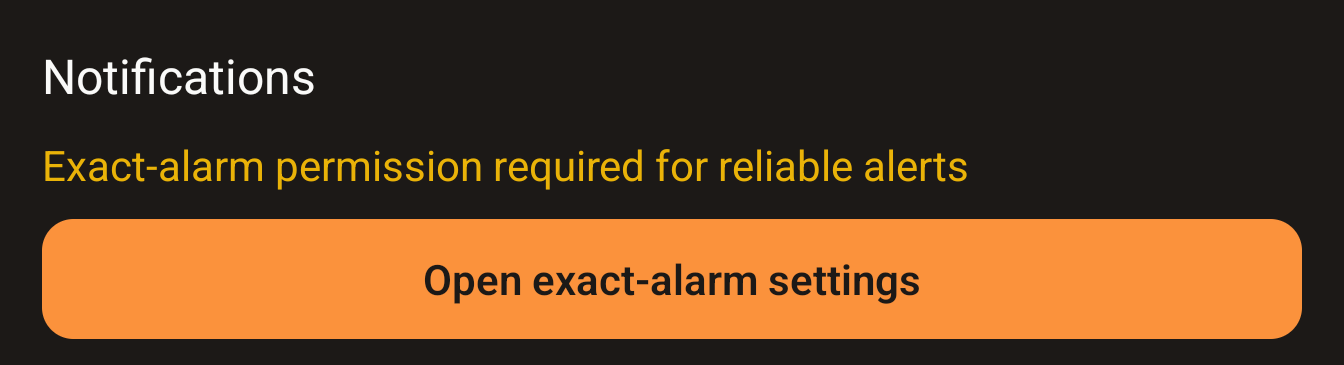
- Find the Notifications section.
- Tap Request Notification Permission.
- Approve the system prompt.
Afterward the section shows one of:
- "Notifications: Enabled" (green) — you're set.
- "Exact-alarm permission required for reliable alerts" (orange) — Android only. Tap the Open exact-alarm settings button, enable "Allow setting alarms and reminders" (wording varies), and return to the app.
- "Notifications: Denied (enable in device settings)" (red) — re-enable BBQ Cook Log notifications in your device's system Settings.
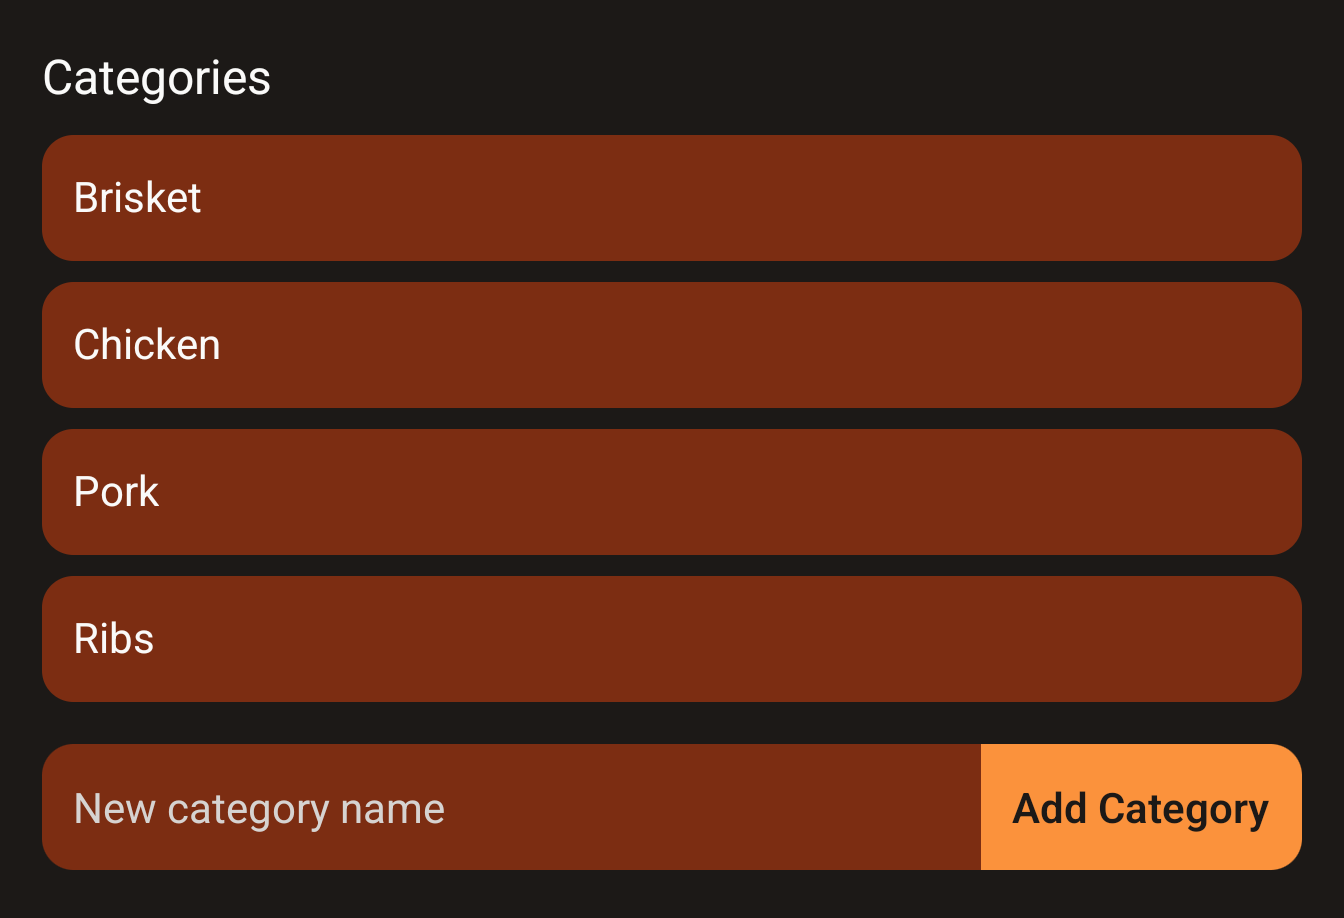
04 Add your categories (meat types)
Categories are your meat types — Chicken, Ribs, Pork, Brisket and any custom classes. They drive per-meat turn-in times and the unified timeline, so set them up first. The app ships with default categories (e.g. KCBS classes), so you may not need to add anything.
Add a category
- Home → Settings, scroll to Categories.
- Type a name in the "New category name" field.
- Tap Add Category.
Rename or delete your own category
- Tap Edit next to it, change the name, tap Save (or Cancel).
- To remove it, tap Delete.
05 Build your library
Everything you cook from starts as a reusable template in Prep Mode. Build each piece once and assemble it into as many cook logs as you like — editing a cook log never changes your templates.
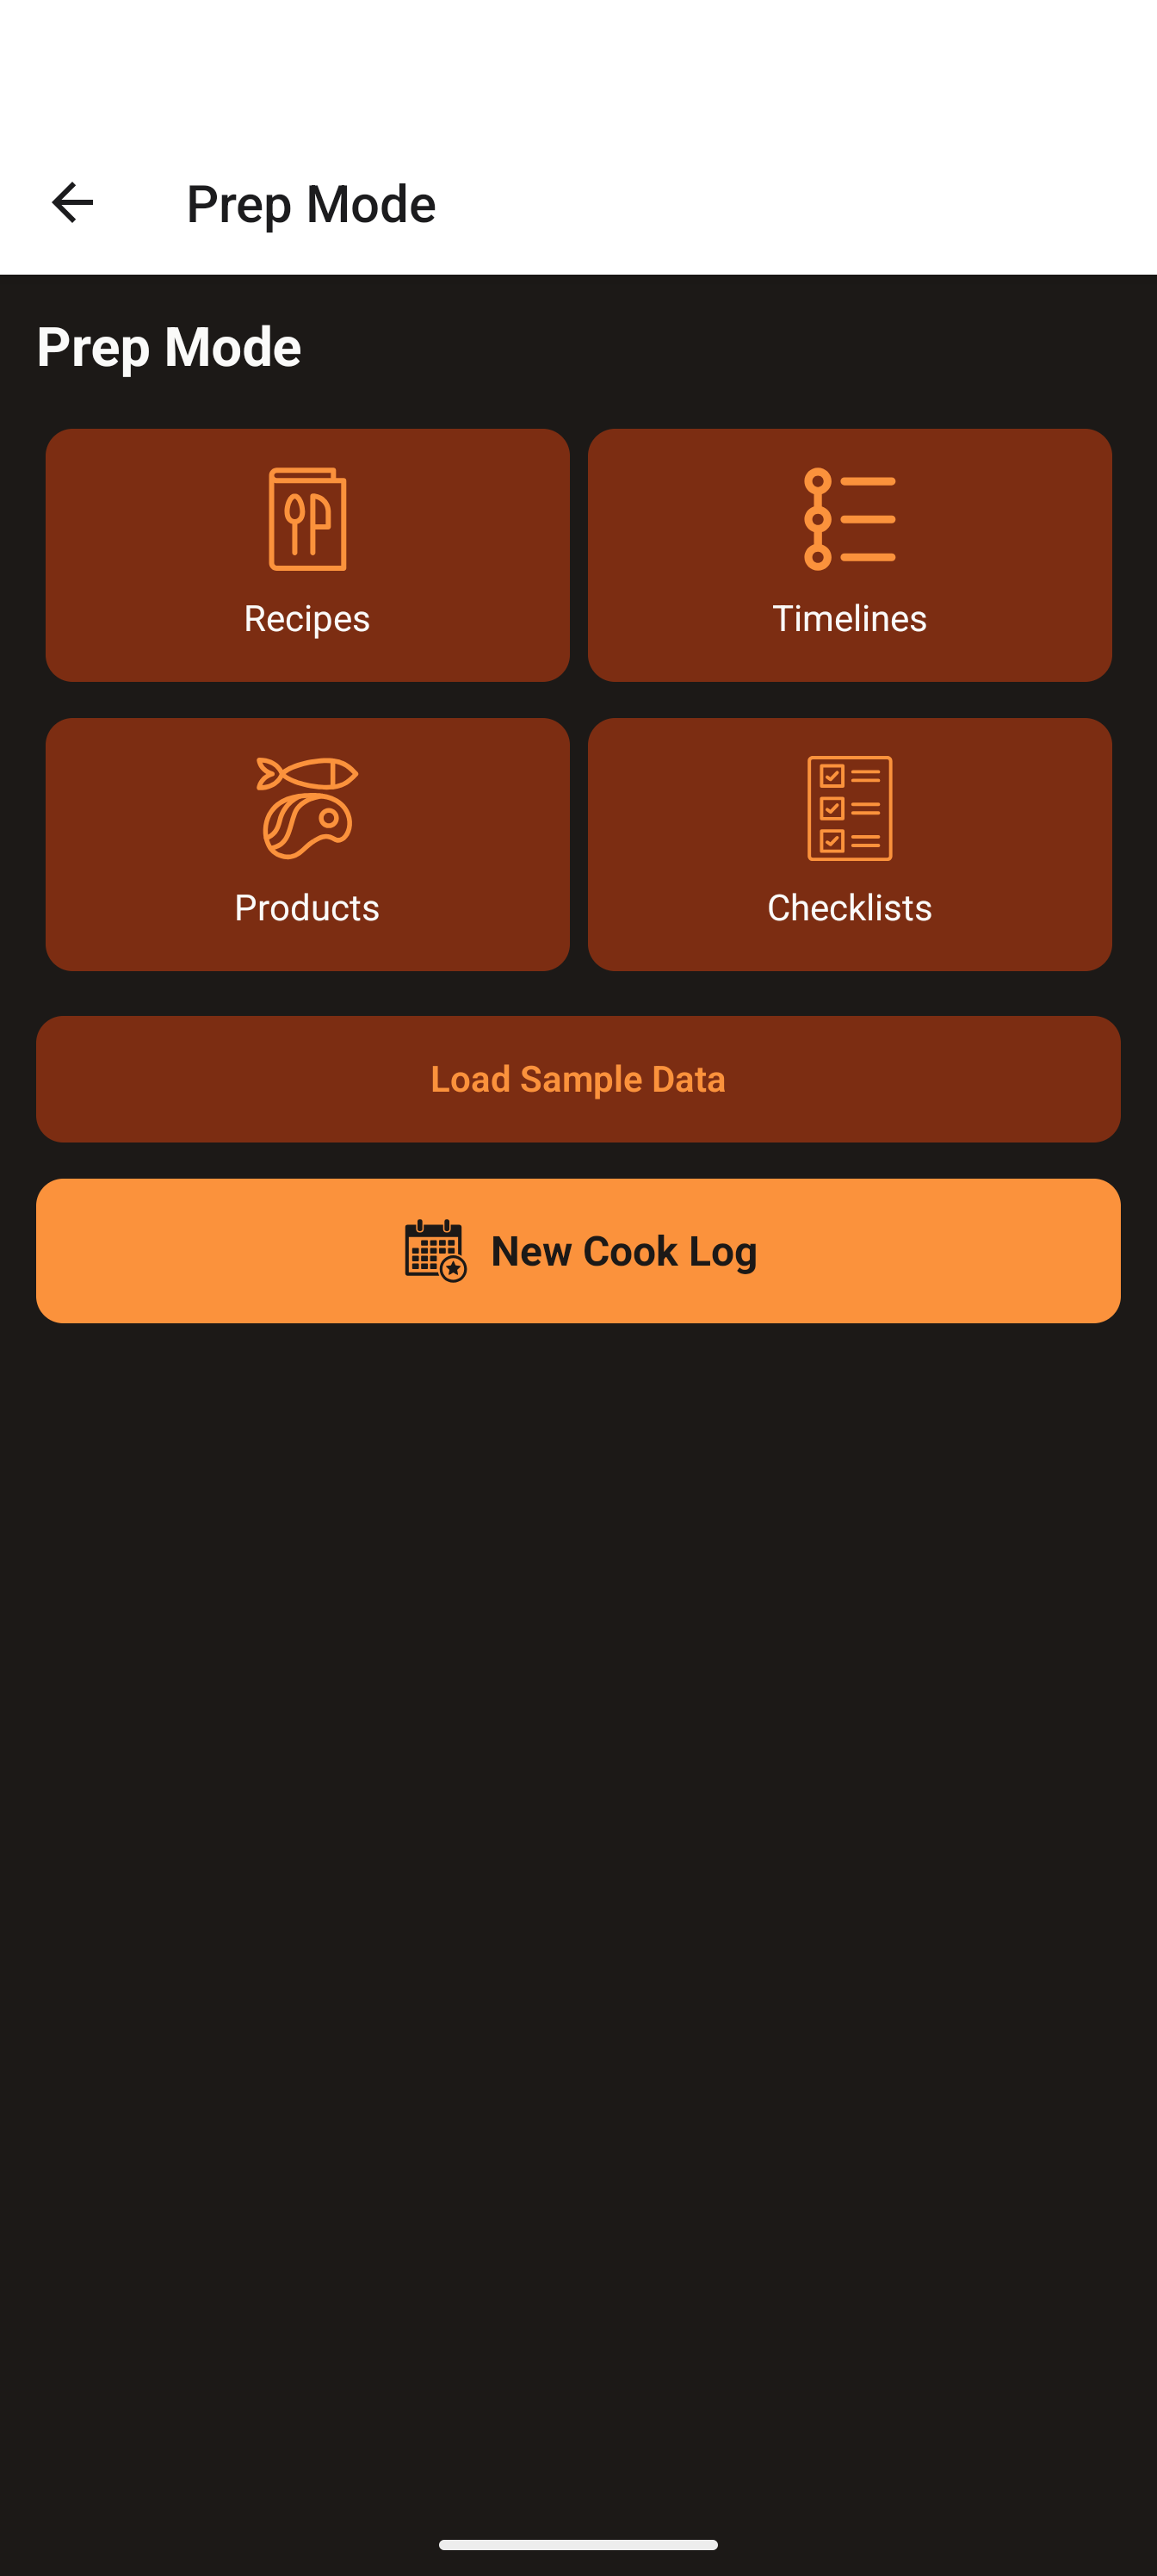
From the home screen, tap Prep Mode to find four library buttons — Recipes, Timelines, Products, Checklists — plus New Cook Log.
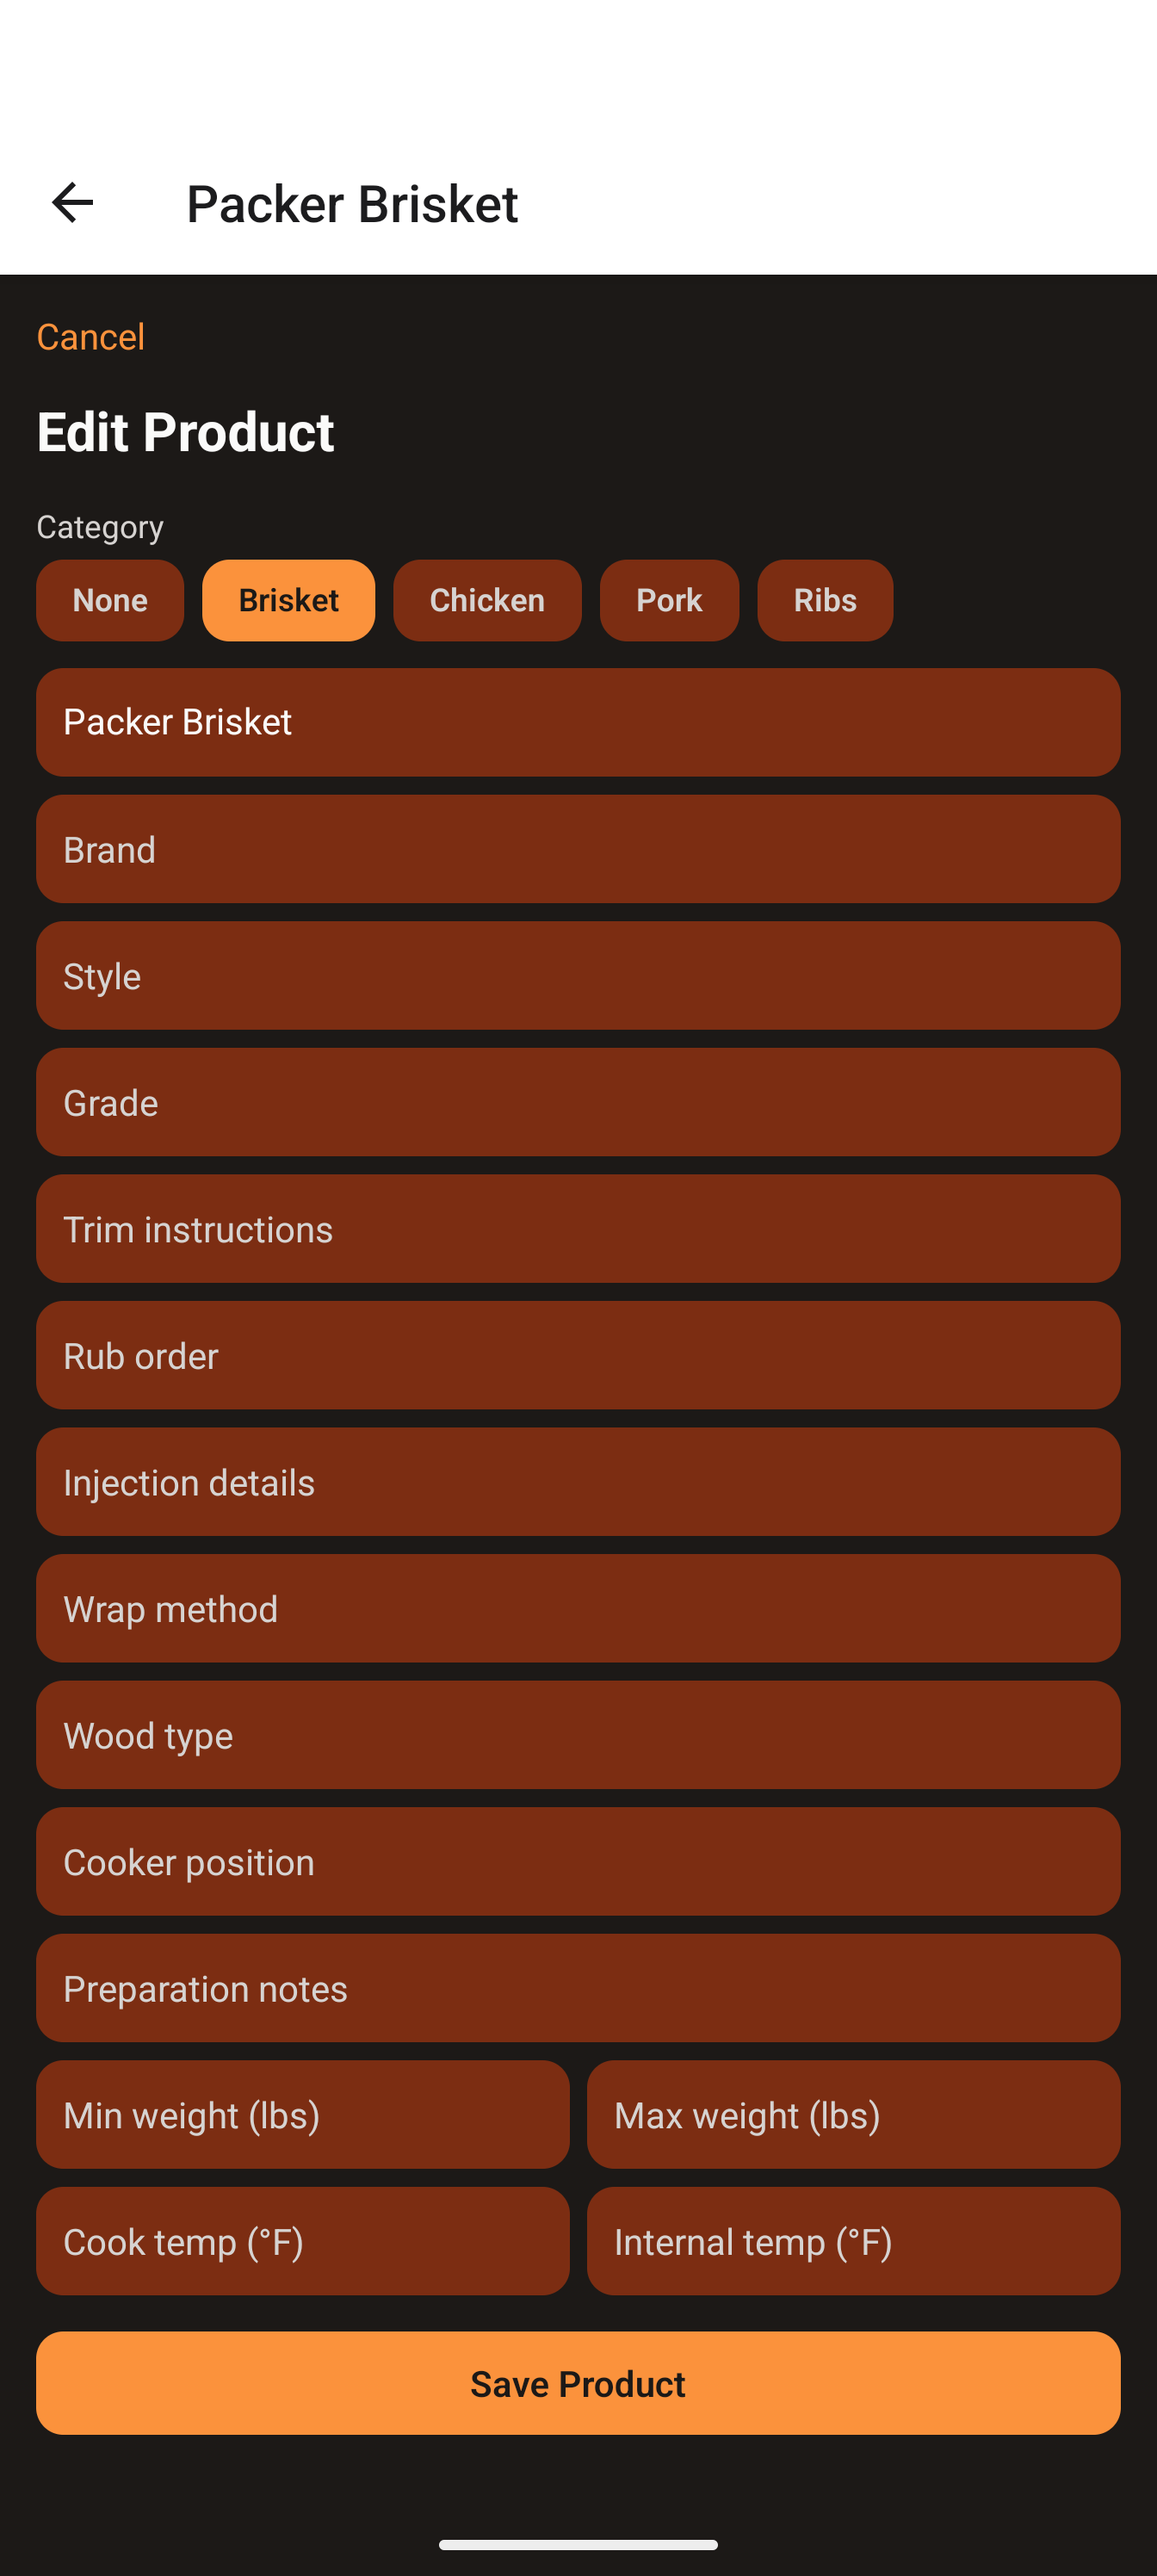
5a · Products
A Product describes a cut of meat and how you prep it.
- Prep Mode → Products → Add Product (title becomes New Product).
- Pick a Category pill at the top (None by default).
- Fill in fields — Meat cut is the main one; also Brand, Style, Grade, Trim instructions, Rub order, Injection details, Wrap method, Wood type, Cooker position, Preparation notes, and numbers for Min/Max weight (lbs), Cook temp (°F), Internal temp (°F).
- Tap Save Product.
Photos: open the product, scroll to Photos, tap Camera or Gallery; tap Remove to delete one.
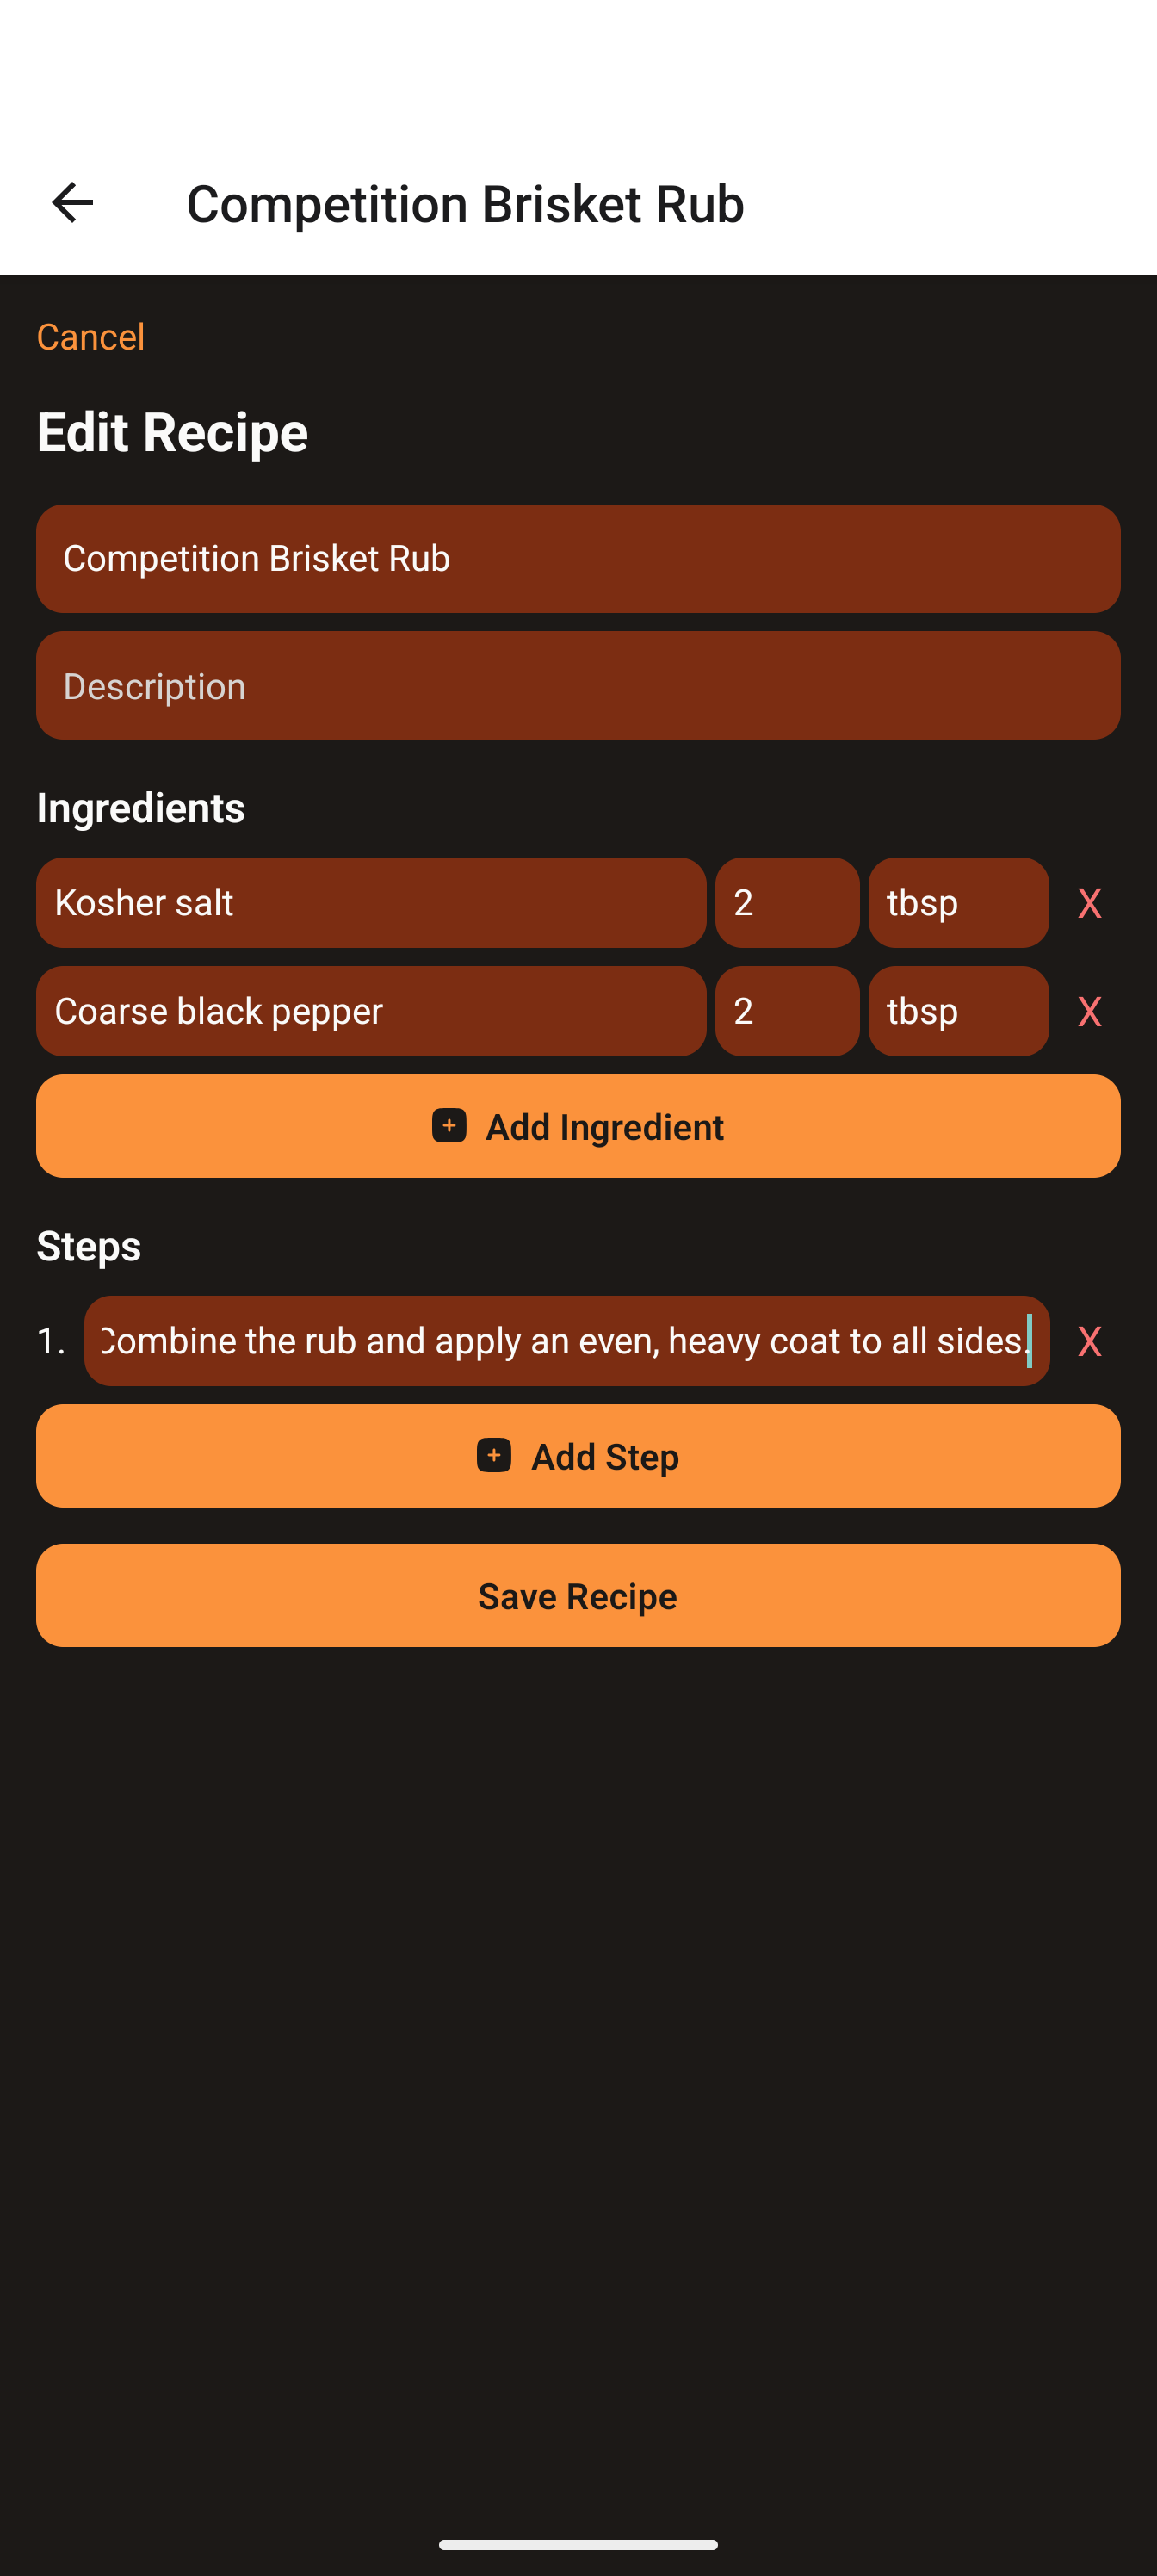
5b · Recipes
A Recipe holds a title, description, ingredients and ordered steps — and can be linked to timeline events.
- Prep Mode → Recipes → Add Recipe.
- Enter a Recipe title and optional Description.
- Under Ingredients, tap Add Ingredient and fill Name, Qty, Unit (tap X to remove).
- Under Steps, tap Add Step for each instruction (auto-numbered).
- Tap Save Recipe.
5c · Checklists
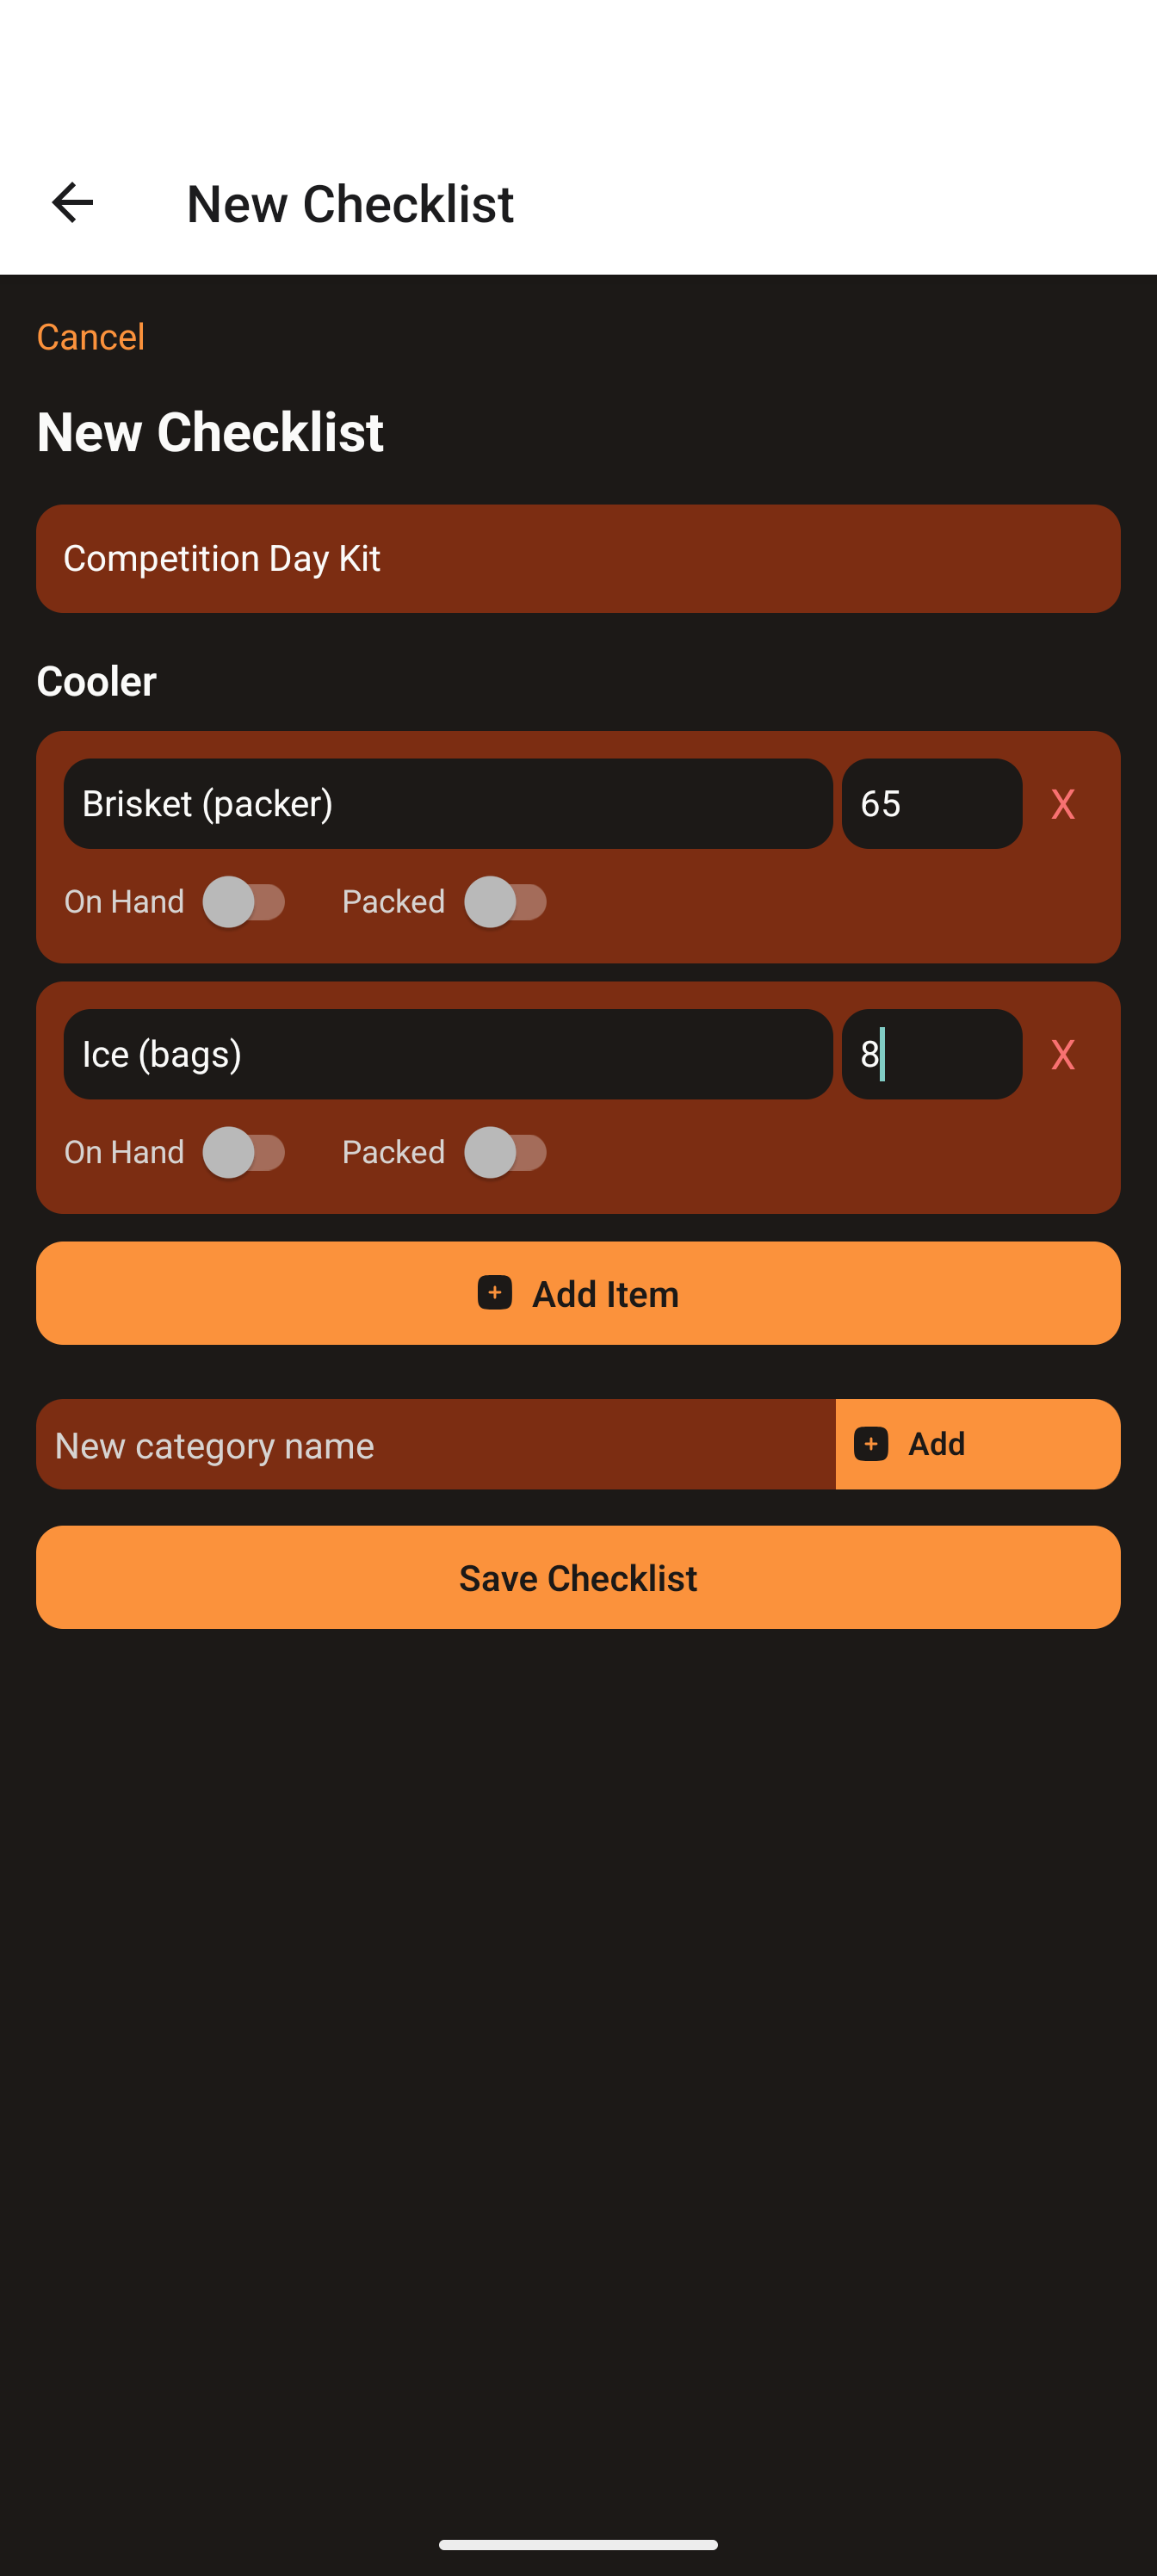
A Checklist is your packing/prep list, grouped by category, with an optional cost per item and On Hand / Packed states.
- Prep Mode → Checklists → Add Checklist.
- Enter a Checklist name.
- Add a group: type a name in New category name, tap Add Category.
- In a group, tap Add Item, then enter Item name and optional Cost.
- Flip On Hand / Packed as needed, then tap Save Checklist.
5d · Timelines (and linking recipes to events)
A Timeline is the playbook for one meat: ordered events timed relative to that meat's turn-in. It becomes your countdown on contest day.
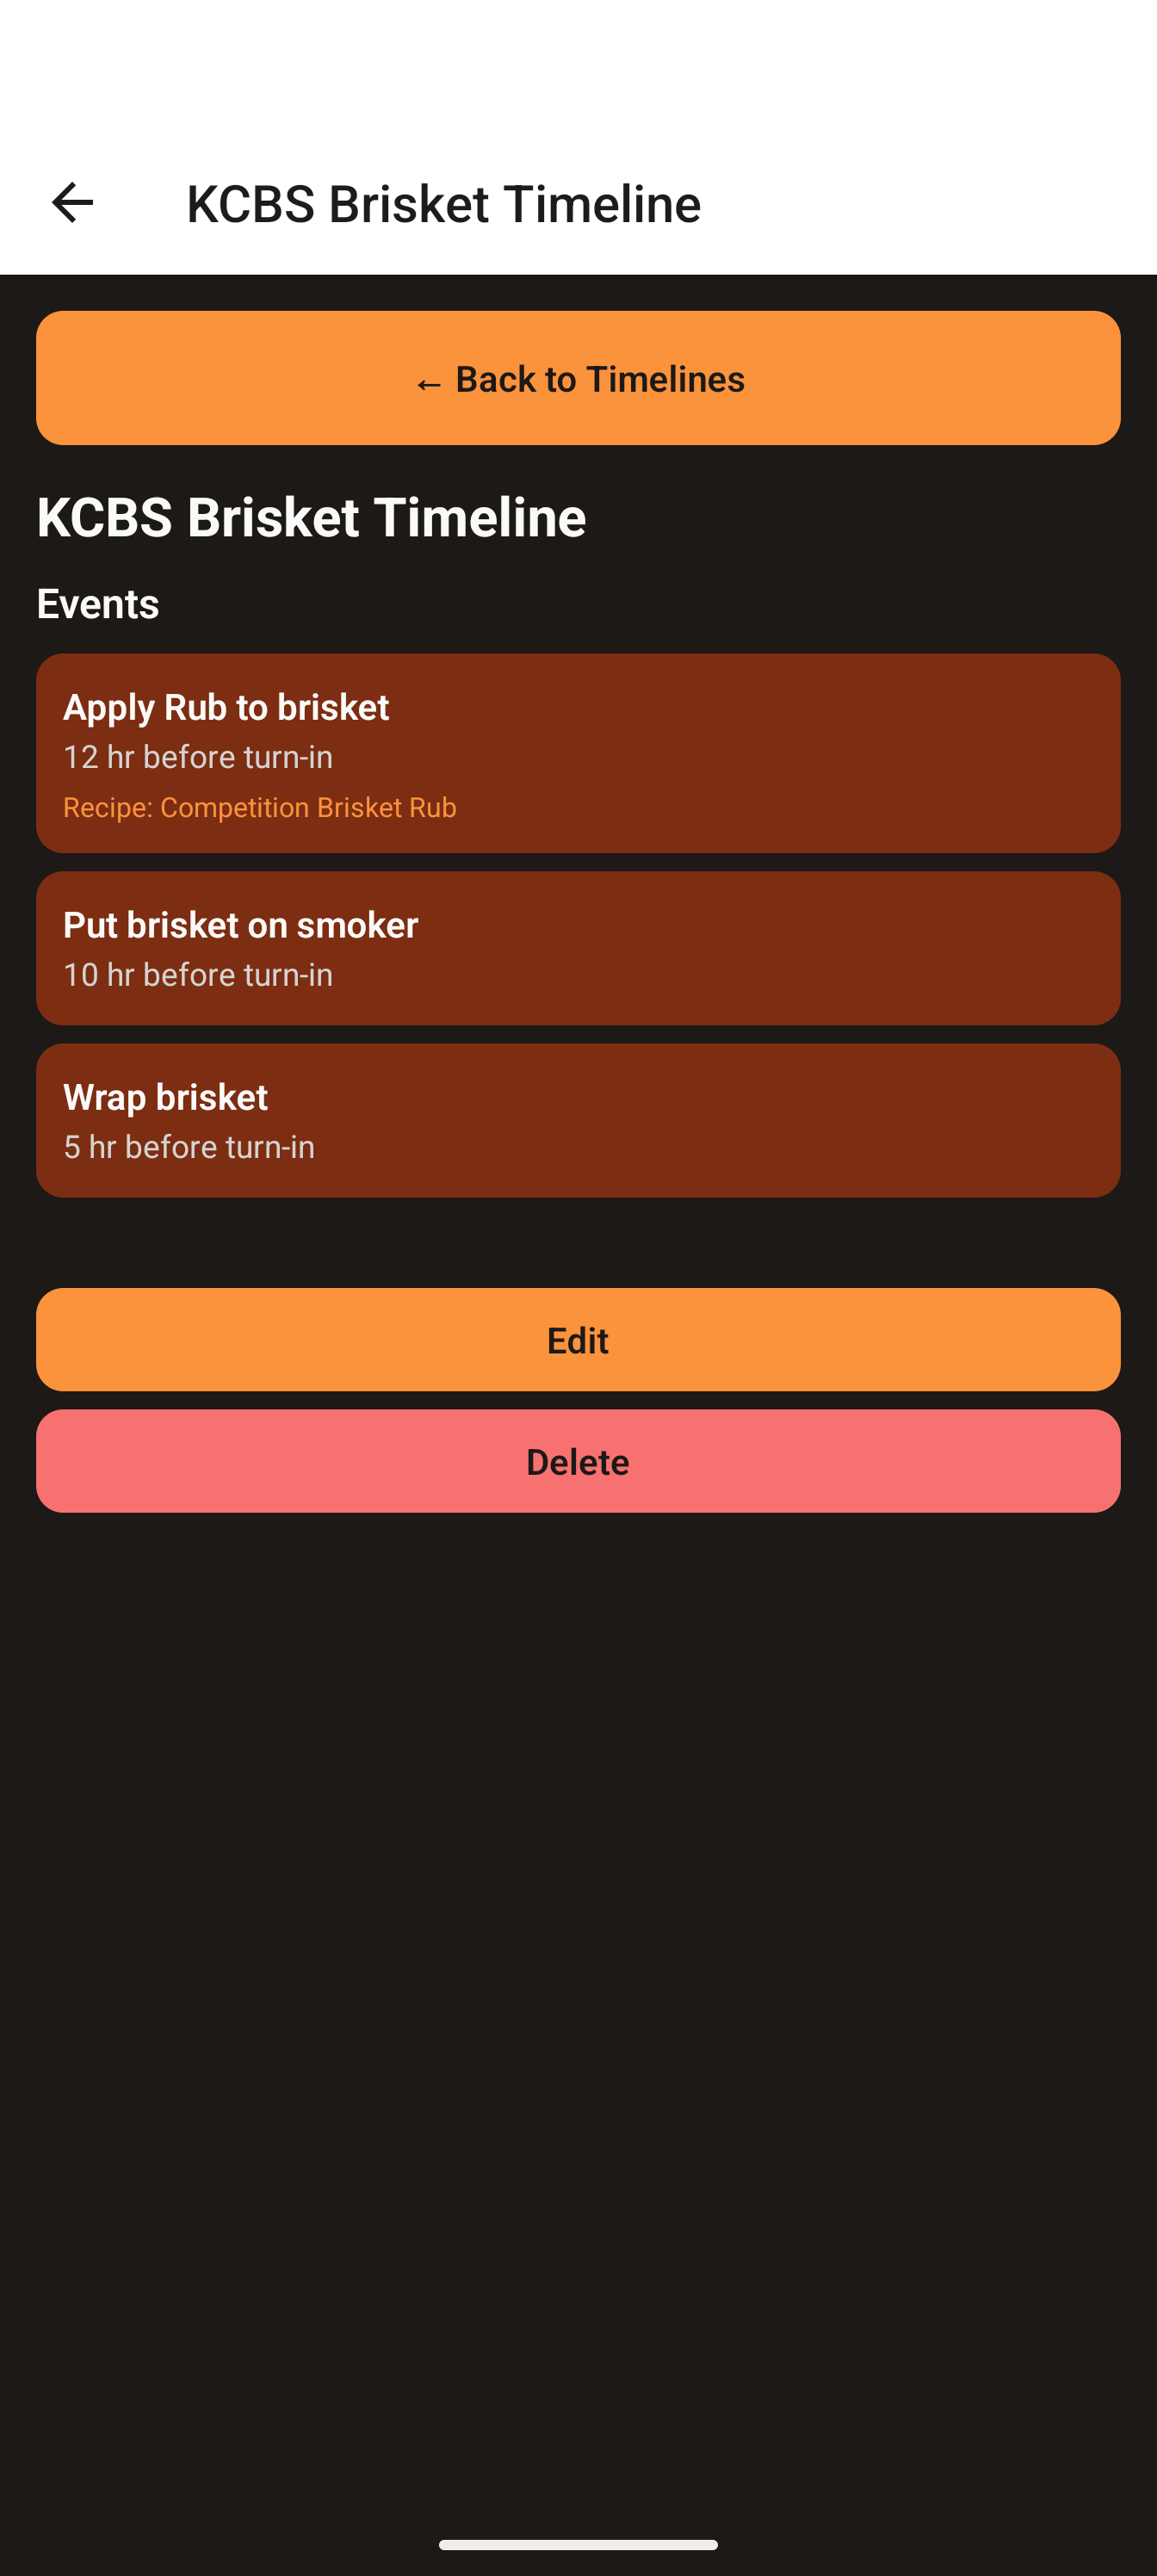
- Prep Mode → Timelines → Add Timeline.
- Enter a Timeline title and optional Description.
- Pick a Category (the meat type).
- Set the Default Turn-In Time (a default; the real time is set when you assemble a cook log).
- Build the Events (below), then tap Save Timeline.
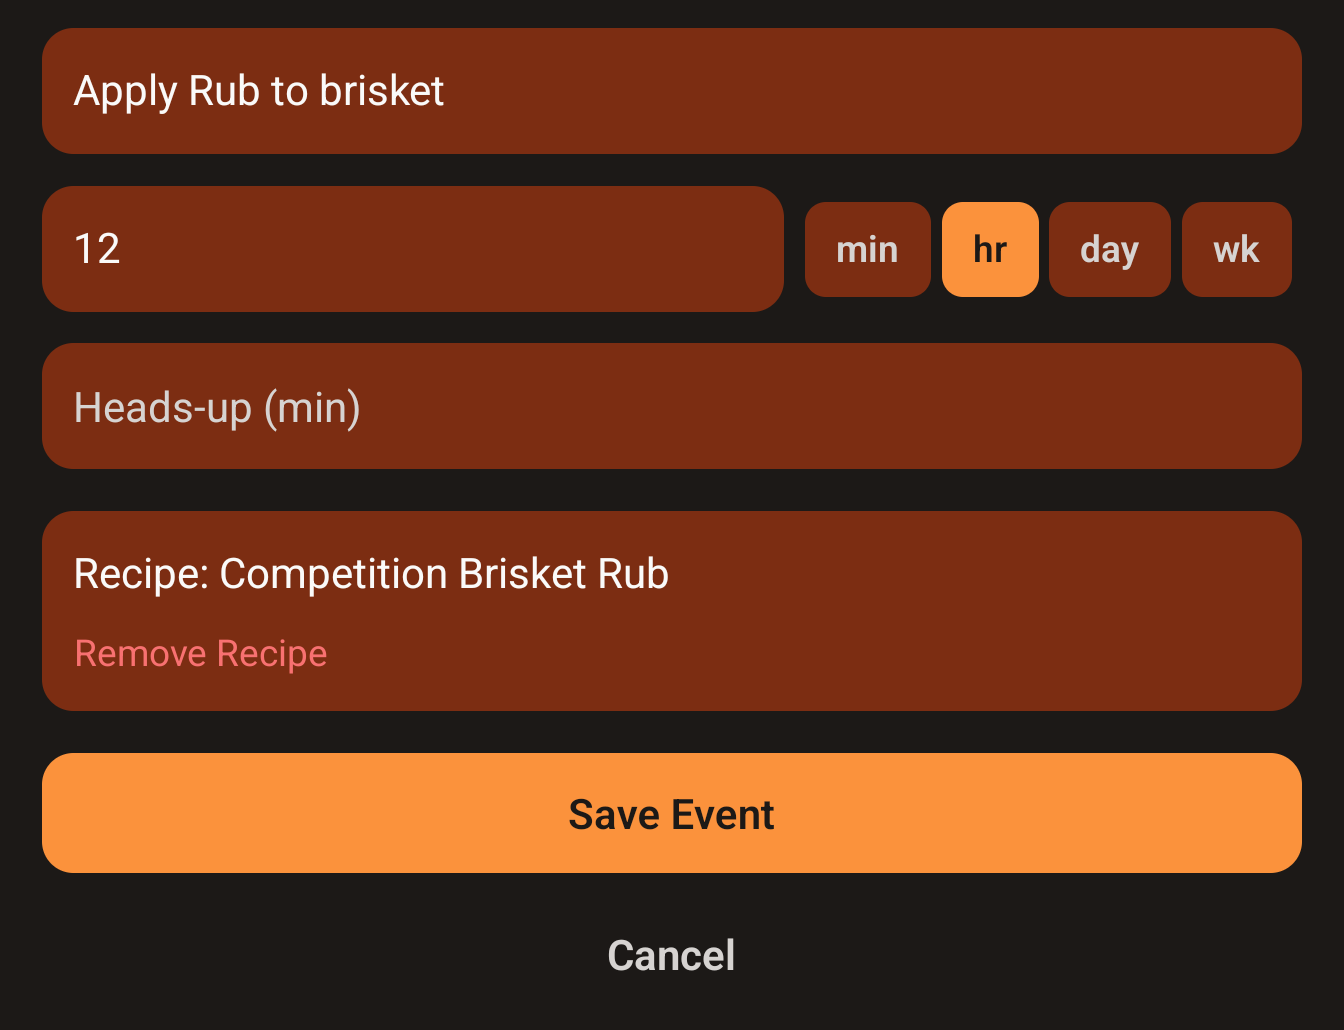
Add an event:
- Tap Add Event — the Event editor opens.
- Enter an Event title (e.g. "Wrap brisket").
- Set when it happens:
- Offset (default): type a number in Offset and pick a unit — min / hr / day / wk. The event is that far before turn-in.
- Date/time: tap Use date/time picker to pick an exact time instead (tap Use offset to switch back).
- (Optional) Set Heads-up (min) — minutes before the event for the gentle pre-alert.
- (Optional) Link a recipe (below).
- Tap Save Event. Repeat for each step.
Link a recipe to an event:
- In the Event editor, tap Select Recipe.
- On the Select Recipe screen, tap a recipe (or Cancel).
- The event shows Recipe: <title>. Tap Remove Recipe to change it.
- Tap Save Event.
Back in the timeline form, each event row shows its title and timing (e.g. "2 hr before turn-in"). Linked events show Recipe: <title> with a View button, plus Edit and X.
5e · Load Sample Data (optional shortcut)
- Home → Prep Mode.
- If your library is empty, a Load Sample Data button appears near the top.
- Tap it — sample recipes, products, checklists and timelines are added instantly.
06 Assemble a draft cook log
Assembling combines templates into one cook log for a specific event. The cook log holds copies — tweaking it never touches your library.
- Home → Prep Mode → New Cook Log.
- Enter Event name, Event date, and Location.
- Timelines: open the picker, select one timeline per meat (Done (N) to confirm). Tap Remove to drop one.
- Turn-in Times: a row appears per meat category — set each real turn-in time (pre-filled from the timeline default).
- Included Recipes: a read-only list of recipes pulled in from your linked events — just confirmation.
- Products and Checklists: open each picker and select what you'll use.
- Tap Create Cook Log.
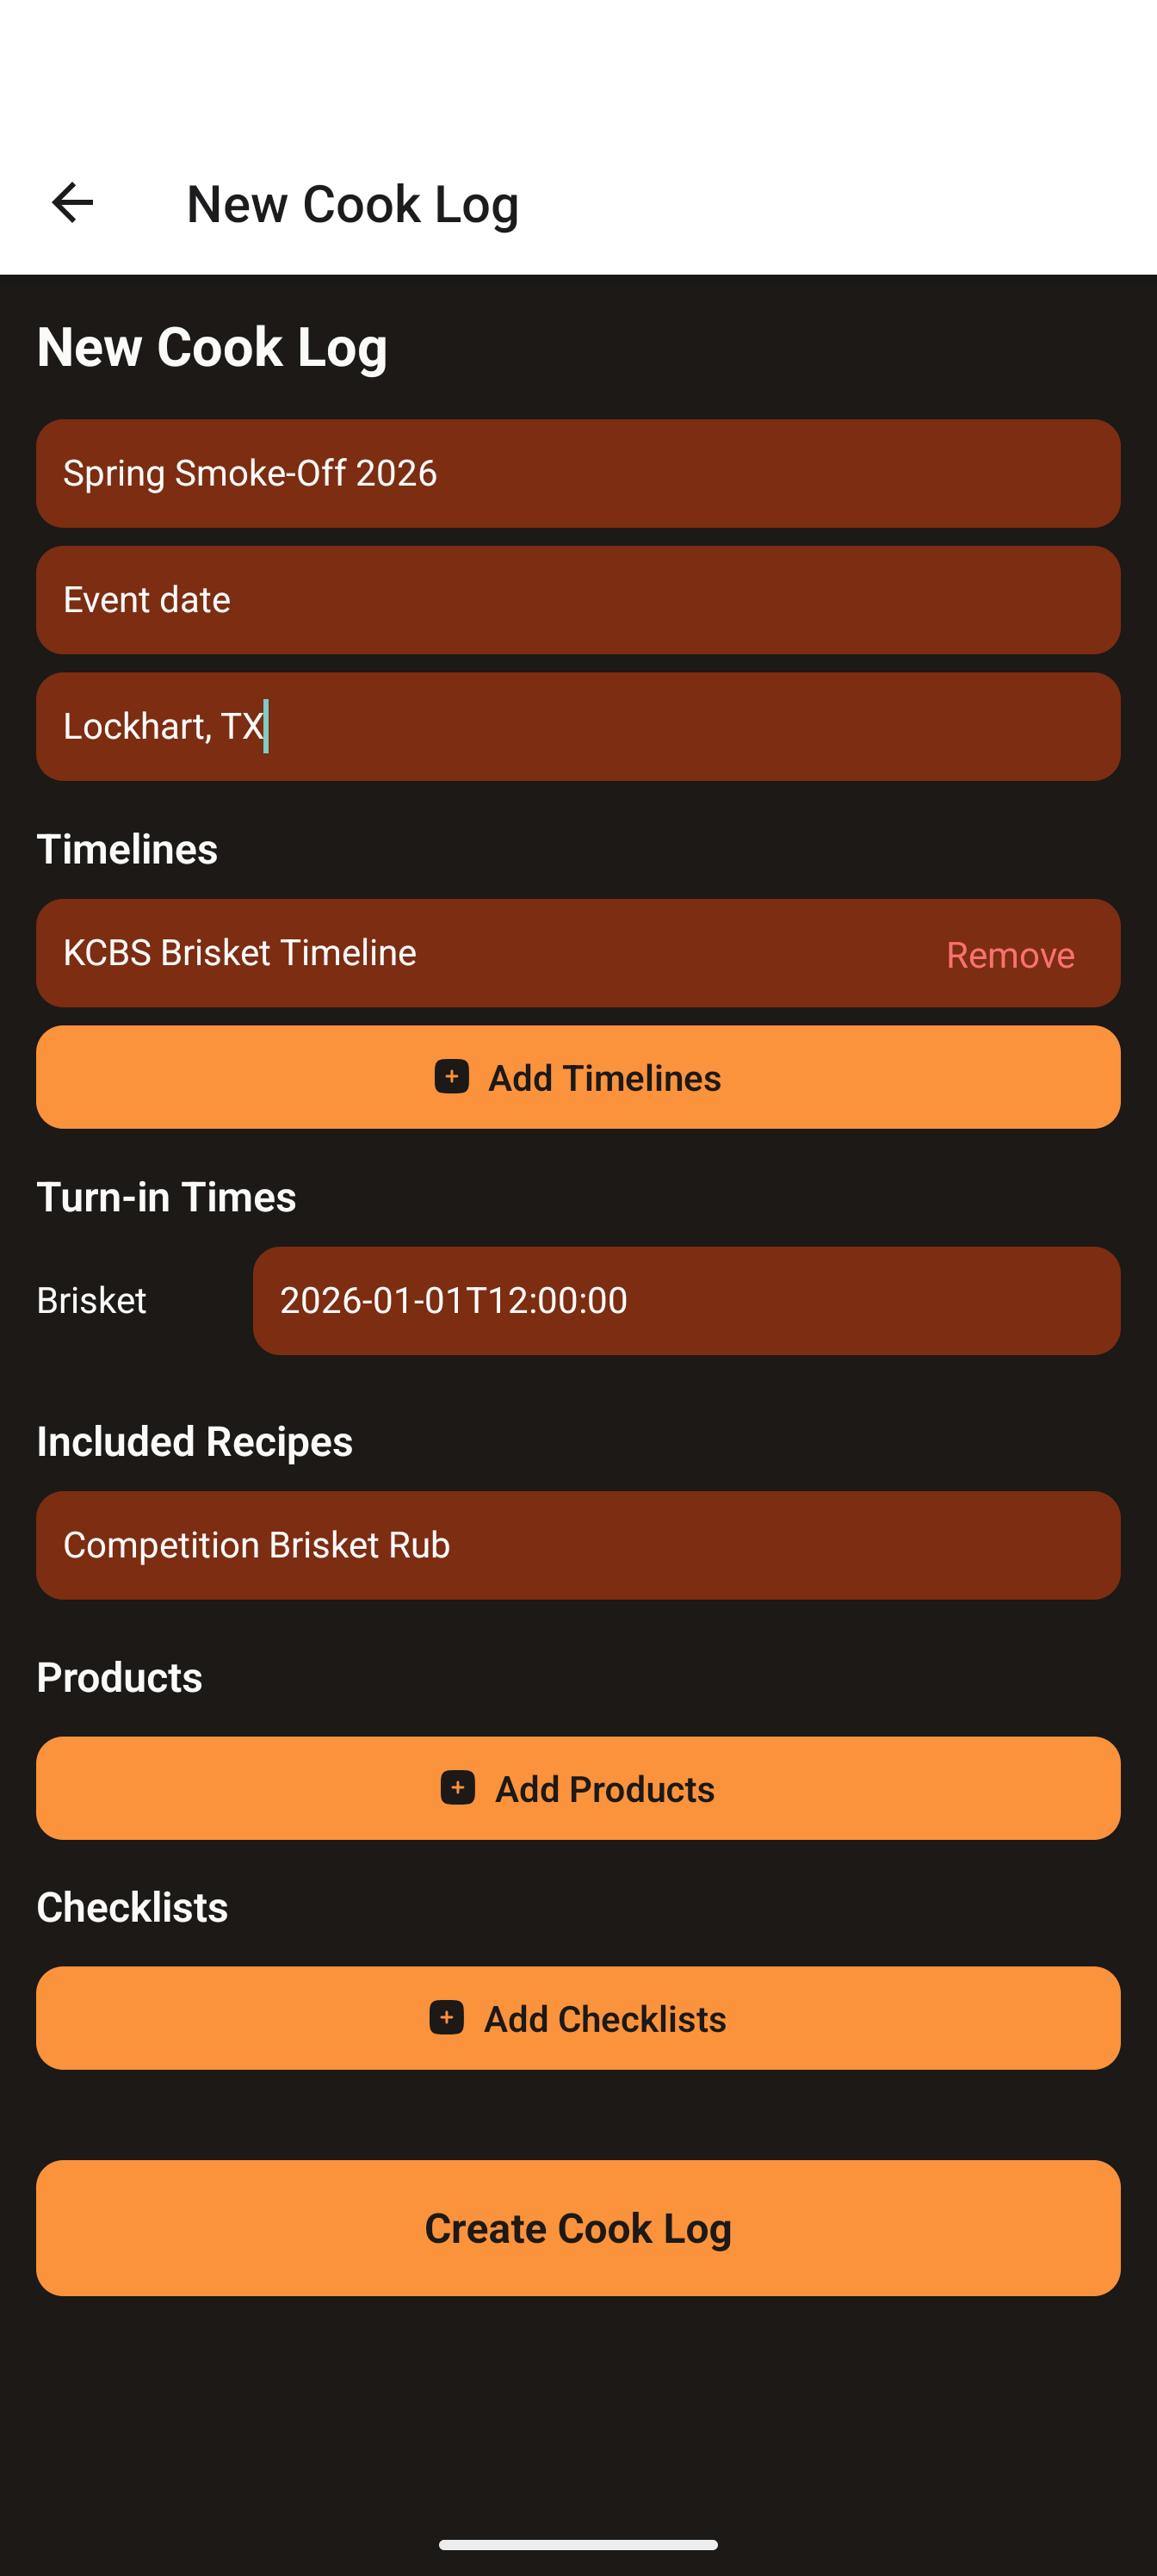
Your cook log is saved as a draft and appears in Prep Mode under Draft Cook Logs with four buttons: Start Competition, Edit, Share, and Delete.
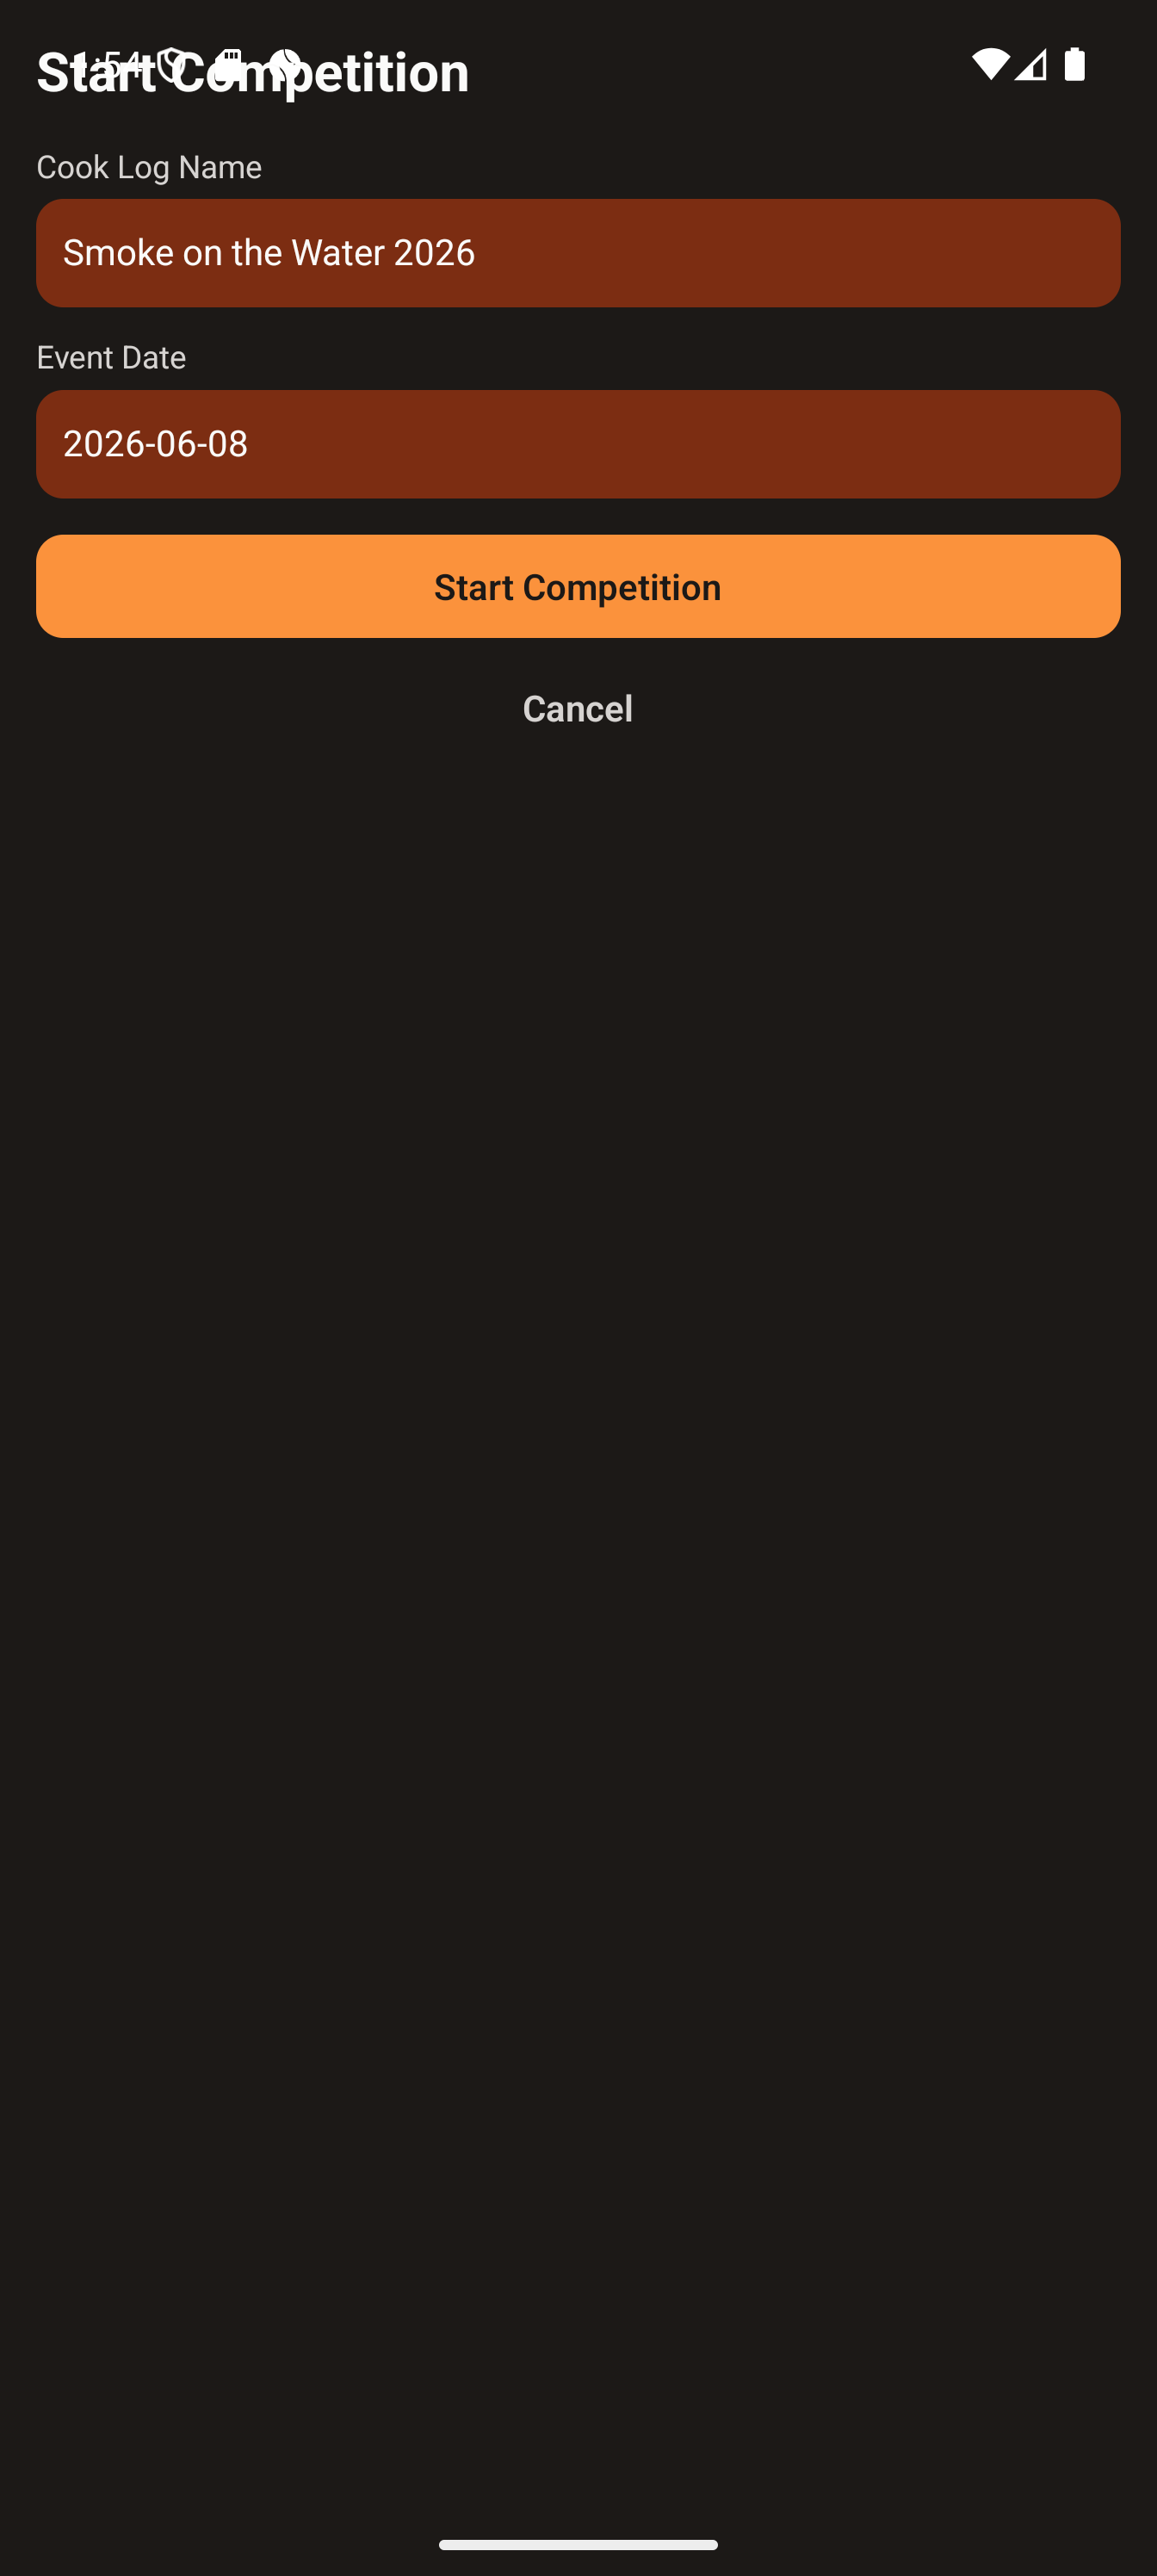
Starting the competition: tapping Start Competition opens a short prompt before the live cook begins:
- Cook Log Name — pre-filled with the draft's name; rename it for this specific event.
- Event Date — pre-filled with the draft's date; tap to pick the real contest date.
Tap Start Competition in the prompt to confirm (or Cancel to start nothing). On confirm, the app launches a copy into Competition Mode under the name you chose and shifts each meat's turn-in onto the event date you picked (keeping its time of day) so the countdown is correct.
07 Run Competition Mode
This is contest day. Open it from the home screen's Competition Mode button. (Teammates who imported the plan open it the same way.)
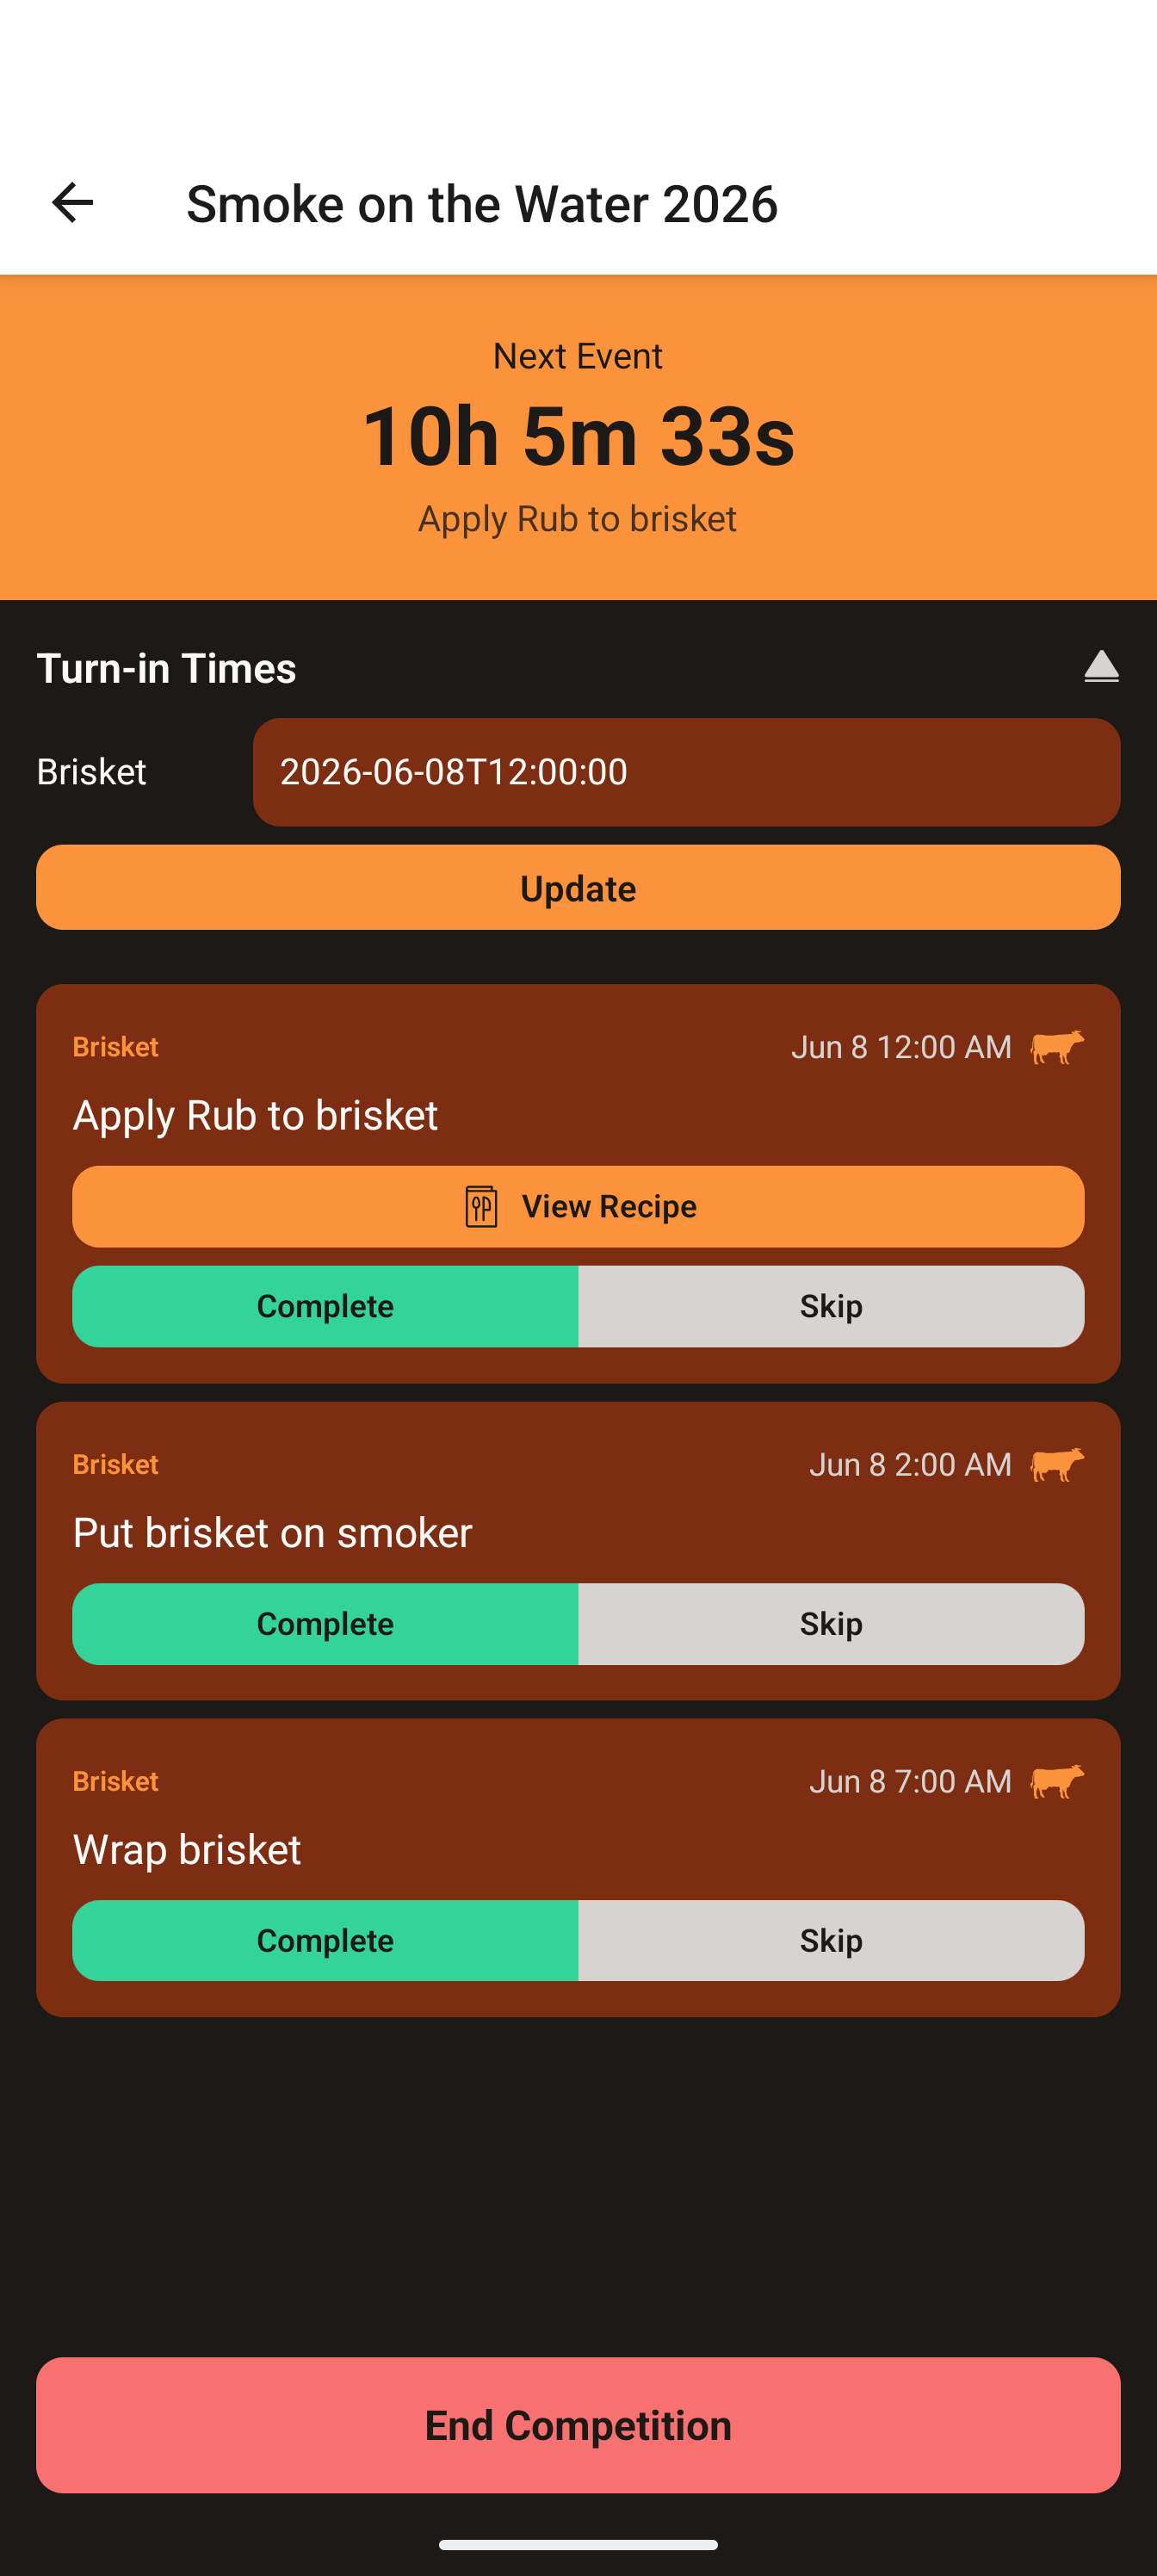
The screen, top to bottom:
- Countdown timer — a big Next Event clock counting to your next action, with that event's title beneath. When done it reads "All events complete."
- Turn-in Times — tap the header to expand, adjust any meat's time, then tap Update to recalculate the whole timeline.
- Checklists — a button (if your cook log has checklist items) to tick On Hand / Packed with running totals.
- Timeline events — the live list of everything still pending, in real-clock order, each tagged with its meat category. Linked events show "Tap to view recipe."
- End Competition — the red button to finish and move into Review.
Working an event: tap Complete (green) when a step is done, or Skip (gray) to dismiss one you don't need. Tap a card with a linked recipe to pop up the full recipe.
Single event (one meat)
One timeline = a single straight list counting down to its one turn-in. From the home screen, if you have exactly one active cook log, Competition Mode opens it directly.
Multiple events (several meats, staggered turn-ins)
With multiple timelines (e.g. Chicken 12:00, Ribs 12:30, Pork 1:00, Brisket 1:30), the app merges every meat's events into one chronological timeline with real clock times. You work one list; each card is tagged with its category and icon. Each meat keeps its own turn-in time — adjust one in Turn-in Times and only that meat's events recalculate. If you have more than one active cook log on the device, tapping Competition Mode first shows a Select Competition picker.
08 Review the cook (scores, photos, fuel)
After turn-ins, capture what happened while it's fresh. Reach Review via End Competition, or later from the home screen's Review Mode button (if more than one cook awaits, pick from Select Cook Log to Review).
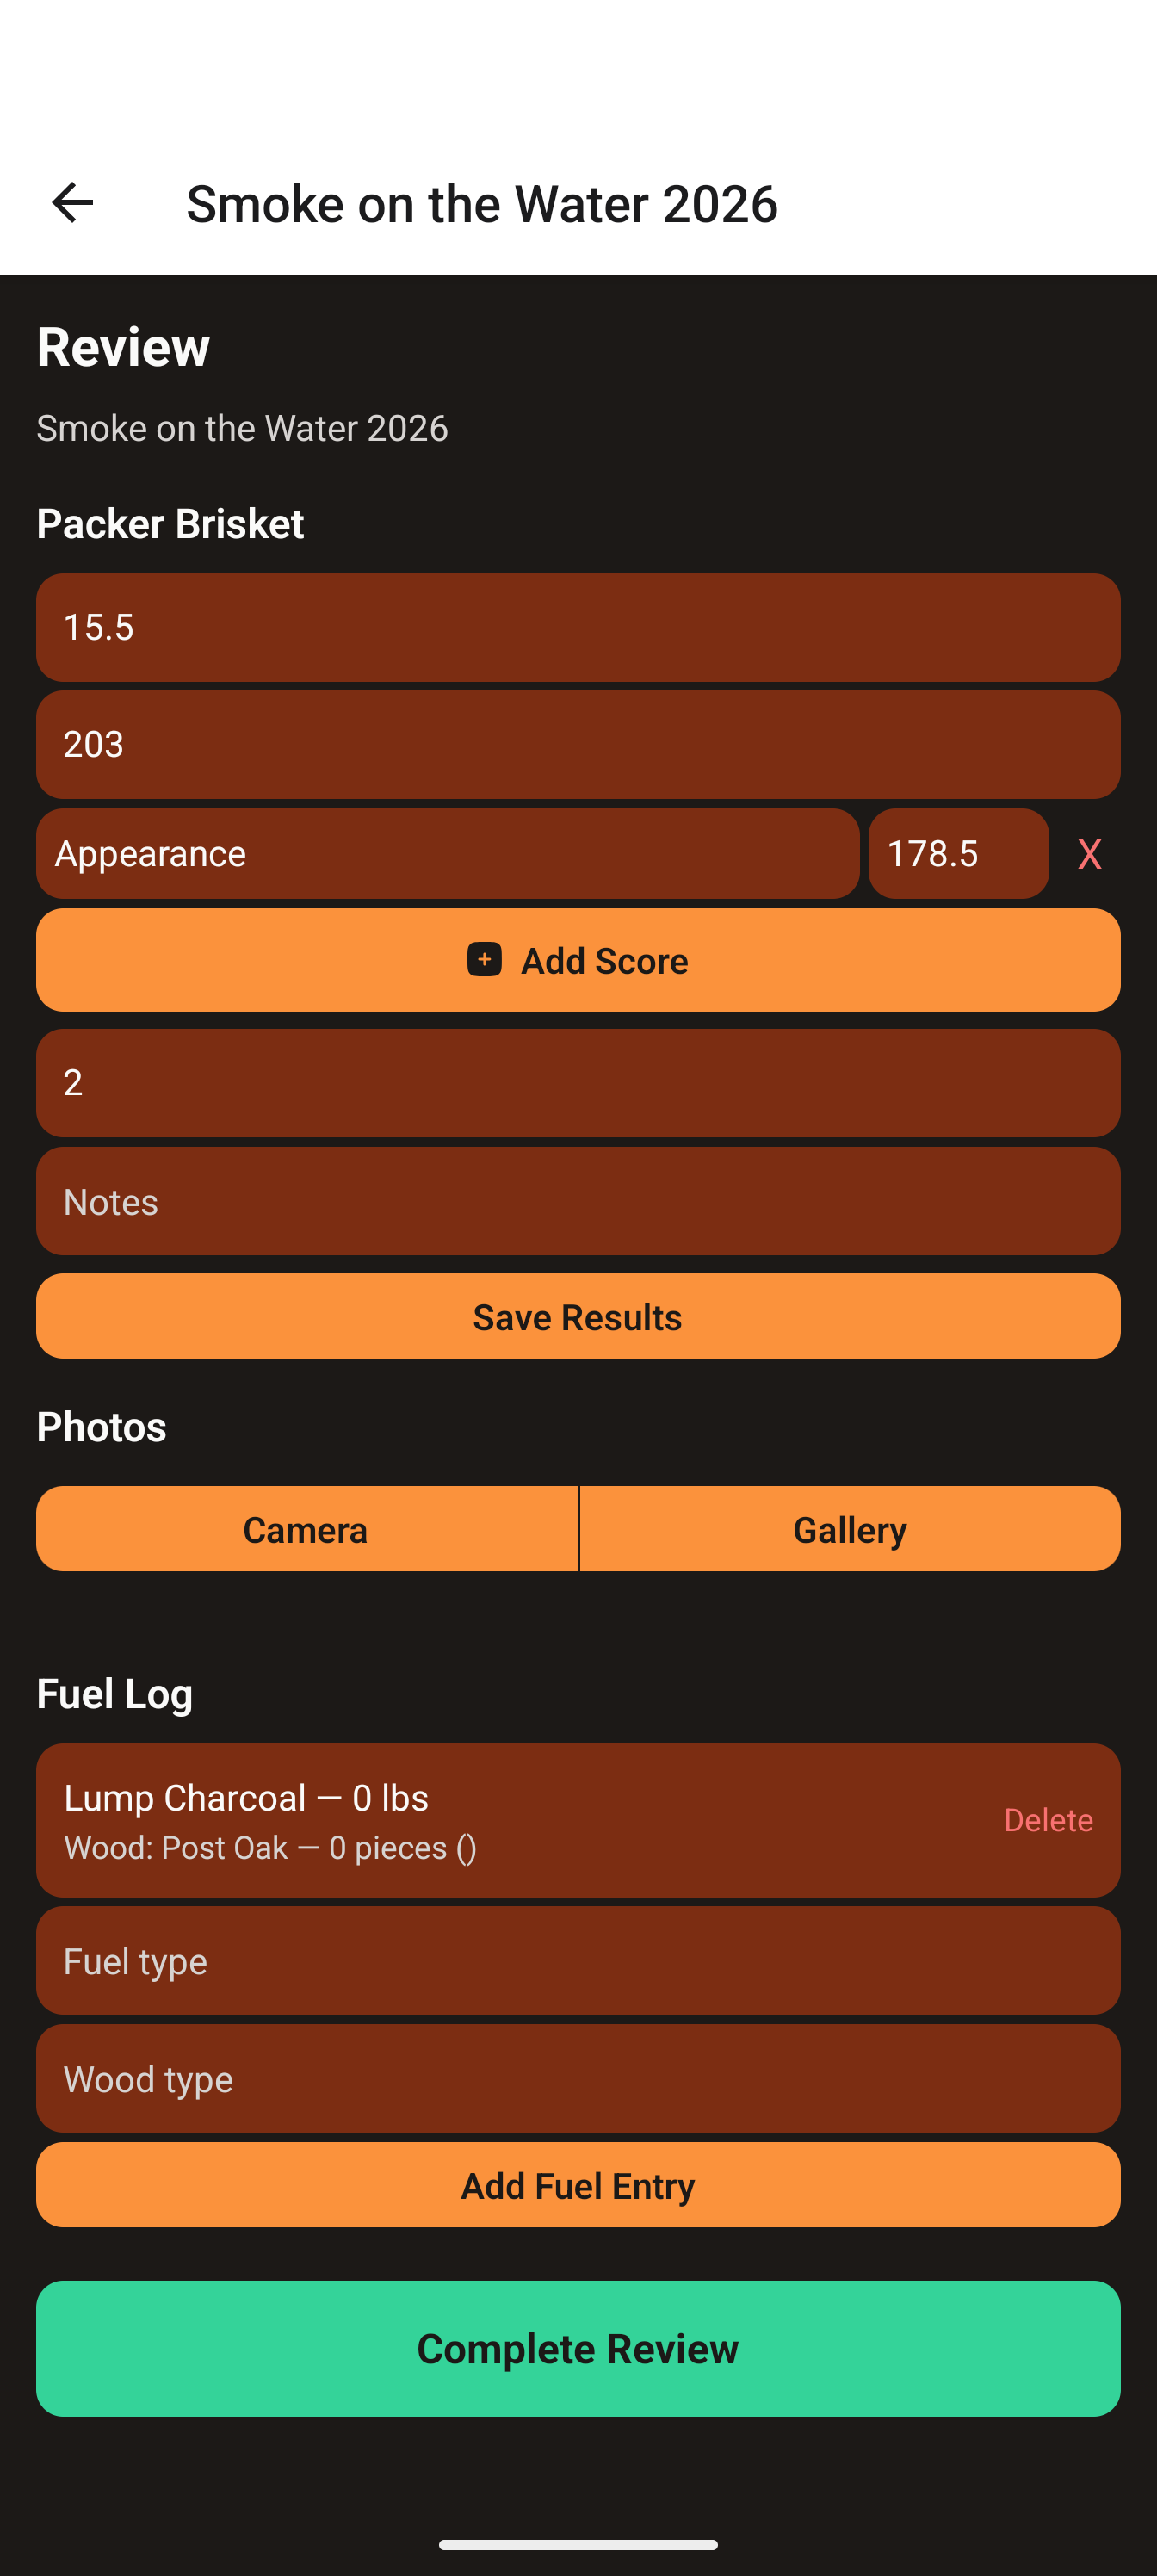
The screen shows the event name and one section per meat. For each meat:
- Actual weight — the cooked/trimmed weight.
- Final internal temp — the temp you pulled at.
- Judge scores — tap Add Score per line, then enter a Label (Appearance, Taste, Tenderness…) and a Value. Tap X to remove a line.
- Placement — where you placed in that category.
- Notes — anything worth remembering.
- Tap Save Results to save that meat's entries.
- Photos — tap Camera or Gallery for box/plating shots; Remove deletes one.
Below the meats is the Fuel Log: enter a Fuel type and Wood type, tap Add Fuel Entry (tap Delete to remove). When done, tap Complete Review (green) — the cook moves to completed and you return home.
09 Reuse a past cook log for a new event
Your best cooks are templates for the next one. Cloning copies the entire plan and resets the results.
- Home → Past Cook Logs.
- Tap a cook log to open its detail view.
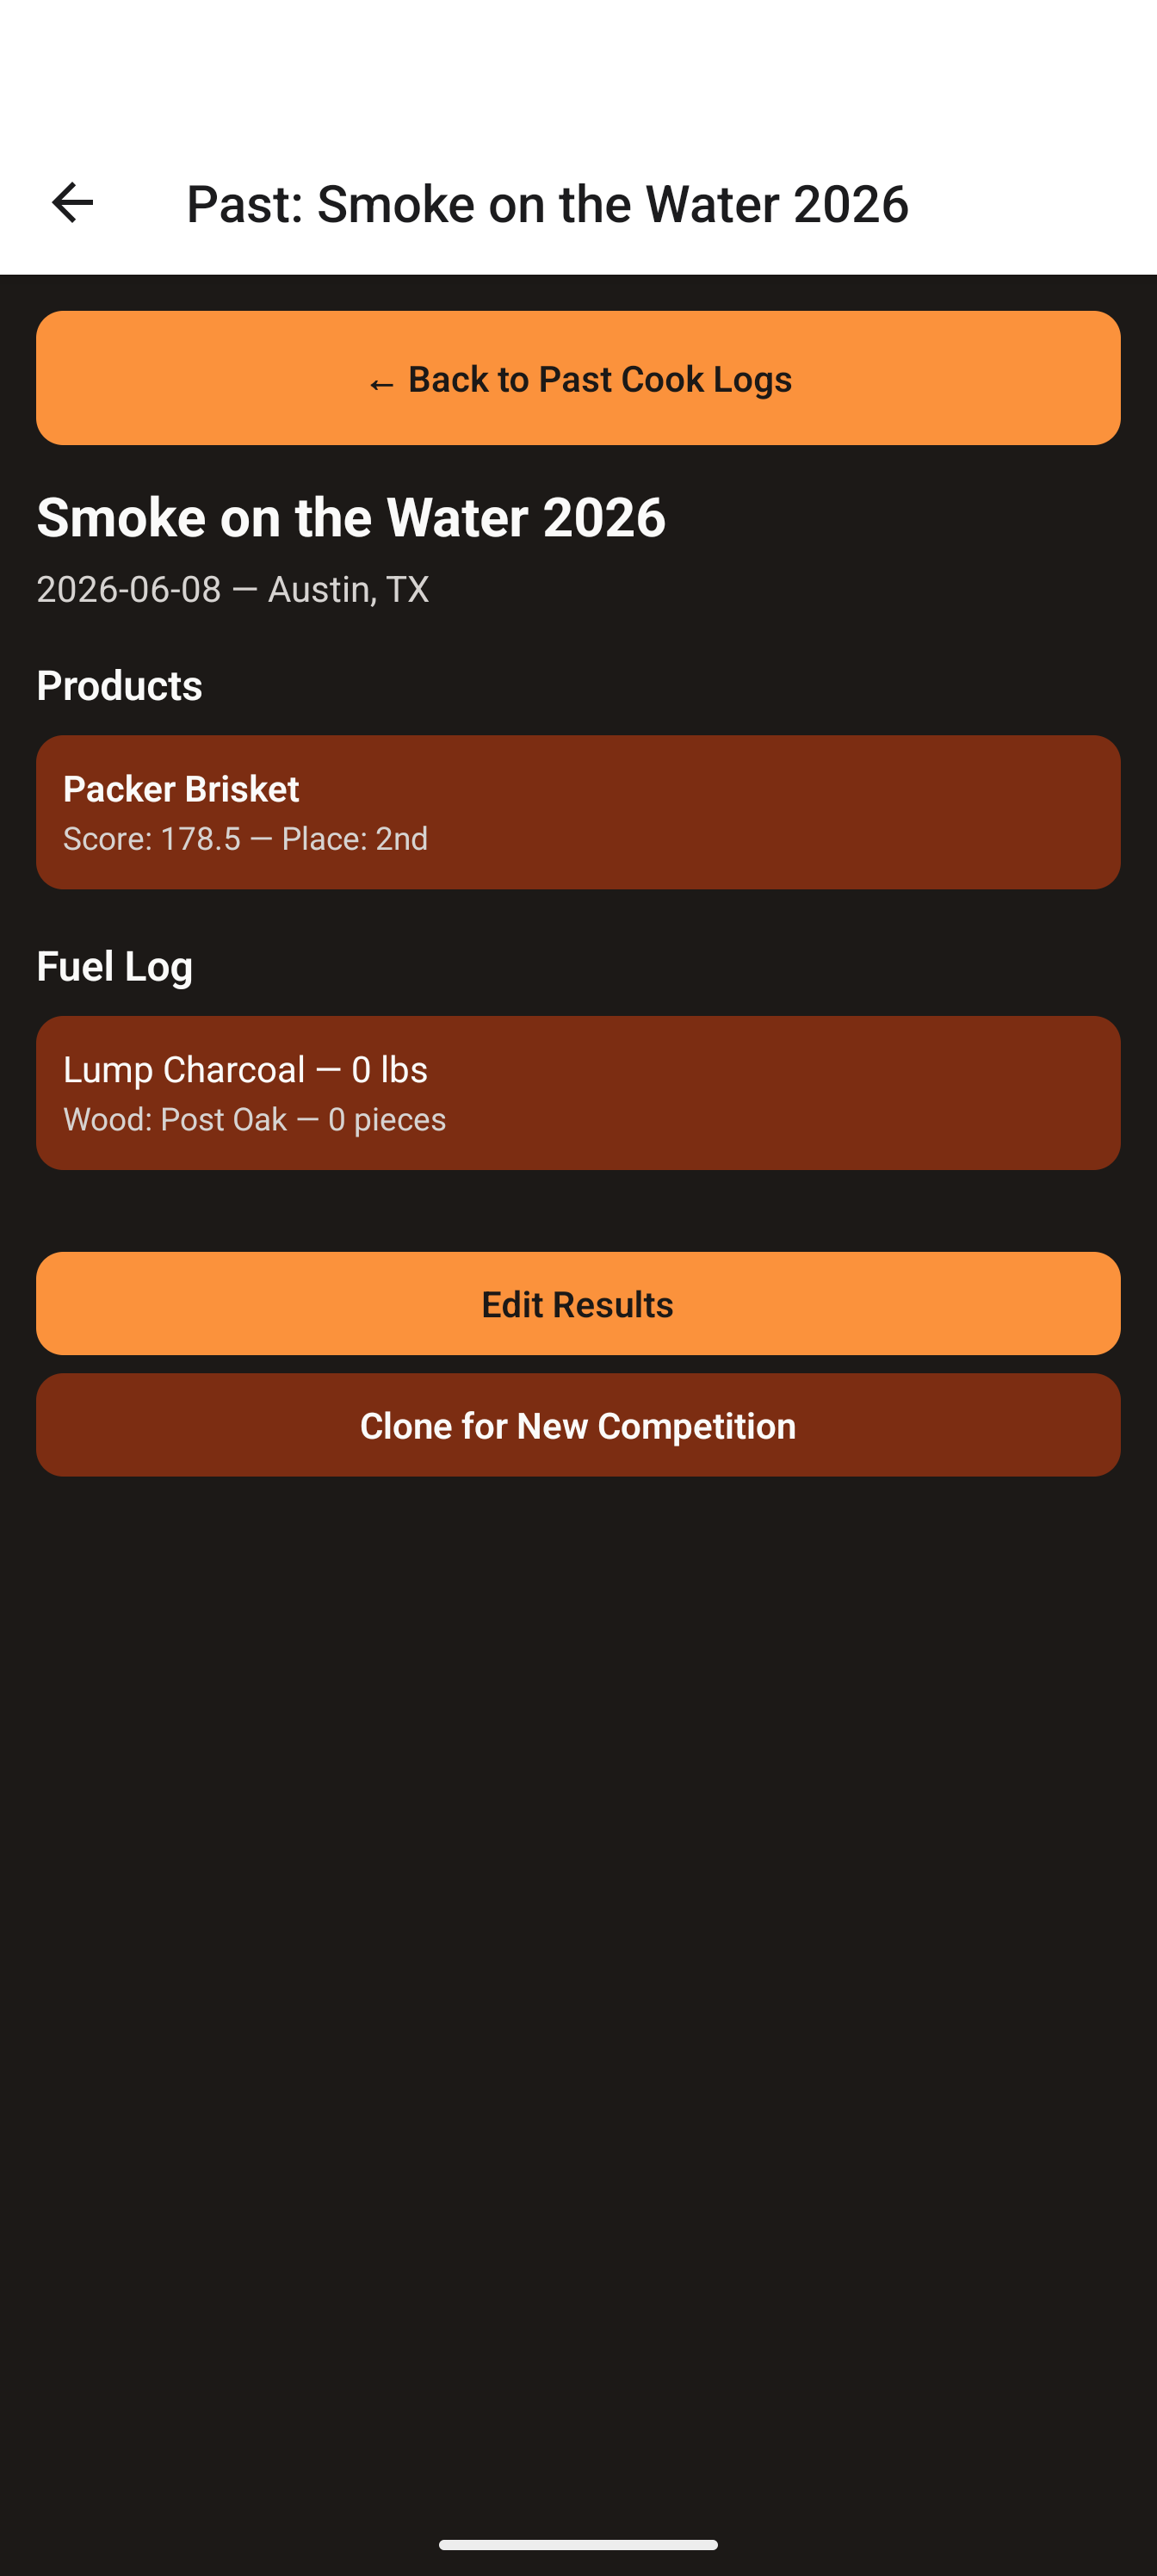
The detail view shows the event, its Products (scores & placements), the Fuel Log, and the Checklist. Captains also see two buttons:
- Edit Results — reopens the cook in Review to add or fix scores, placements, photos or fuel.
- Clone for New Competition — creates a brand-new draft from this cook.
To reuse a cook:
- Tap Clone for New Competition.
- Go to Prep Mode → Draft Cook Logs — your cloned draft is there, planning copied and results cleared.
- (Optional) Tap Edit to set the location or adjust turn-ins.
- When ready, tap Start Competition — the prompt lets you set this event's name and date right there before the cook begins (Section 6).
11 iOS vs Android — quick reference
The app works the same on both platforms; the differences are all at the operating-system level.
| Topic | iOS (iPhone / iPad) | Android |
|---|---|---|
| Notification permission | Approve the system prompt once. | Same — tap Request Notification Permission and approve. |
| Exact alarms | Not applicable — you're done after notifications. | Required. Tap Open exact-alarm settings and allow alarms/reminders. |
| Minimum OS | iOS 13 or later. | Android 6.0 or later. On Android 11 and below, exact alarms are auto-granted. |
| Camera / Photos | Prompts on first use. | Prompts on first use. |
| Sharing | Native share sheet (AirDrop, Messages, Mail…). | Android share sheet (Nearby Share, Gmail…). |